
DMS Academy
FTTEGO DMS Academy

تعلّم استخدام FTTEGO DMS خطوة بخطوة.

دليل عملي بالصور للعثور على الأجهزة، وعرض صور الشاشة والفصل، وتجهيز نماذج المدرسة، وإنشاء المحتوى التعليمي، وتنظيم الملفات السحابية. اختر المهمة واتبع خطواتها.

21 درسًا قصيرًا · العربية · آخر مراجعة: 19 أكتوبر 2026
جلسة أولى مفيدة
  1. اعثر على جهازك وتحقّق من حالته.
  2. أنشئ درسًا تجريبيًا وراجع محتواه.
  3. اعثر على الملف المحفوظ داخل AiCloud.

اختر المهمة واتبع الخطوات.

أسماء الأزرار مطابقة للواجهة الإنجليزية والصور الأصلية. وسّع القائمة الجانبية، ومرّر الجداول العريضة والنماذج الطويلة عند الحاجة. اضغط أي صورة لفحصها بحجمها الأصلي.

لا توجد دروس مطابقة. جرّب اسم زر أو عبارة أقصر.

ابدأ هنا

01

HOME

جميع المستخدمين · 2 دقائق

تعرّف على واجهة النظام

تعرّف على الأجزاء الأساسية لمساحة العمل قبل البدء.

  1. افتح dms.fttego.com وسجّل الدخول بالحساب المخصص لك.
  2. اضغط أيقونة القائمة أعلى اليسار لإظهار أسماء الأقسام. اختر HOME للعودة إلى لوحة المعلومات.
  3. استخدم القائمة الجانبية لفتح القسم المطلوب، مثل DMS أو Group أو Account أو AI Gen أو Resource أو MyCenter.
  4. استخدم التبويبات العلوية للرجوع إلى صفحة مفتوحة. يوضّح شريط المسار أسفلها موقعك الحالي داخل النظام.
  5. استخدم قائمة اللغة أعلى اليمين لتغيير لغة واجهة الويب، وافتح Personal Settings من قائمة الحساب للوصول إلى ملفك الشخصي.

النتيجة المتوقعة: يمكنك فتح القسم المطلوب والعودة إلى HOME.

نصيحة للاستخدام: تتحدد الأقسام الظاهرة حسب صلاحيات حسابك. تضم قائمة Resource القابلة للتوسيع تصنيفات المواد، ويفتح مدخل Resource المنفصل وحدات الموارد.

الأجهزة

02

DMS

مستخدمو الأجهزة · 2 دقائق

ابحث عن جهاز وتحقّق من حالته

حدّد الجهاز الصحيح قبل فتح أدوات التحكم الخاصة به.

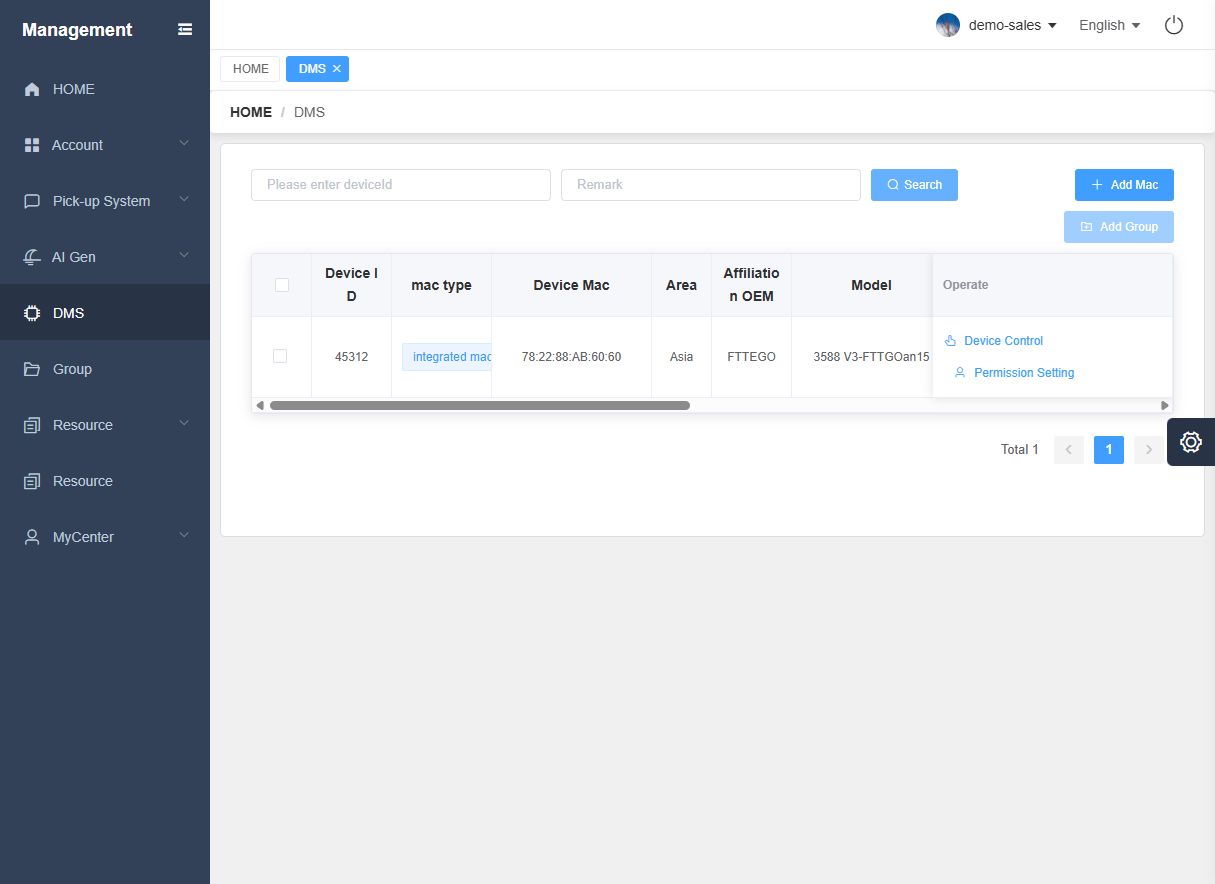
  1. اختر DMS من القائمة الجانبية.
  2. أدخل قيمة Device Mac كاملة في Please enter deviceId، أو اكتب ملاحظة الجهاز في Remark.
  3. اضغط Search. امسح أي حقل بحث لا تحتاجه حتى لا يقيّد النتائج.
  4. راجع Device Mac وModel وState وOnline Status. اسحب شريط التمرير الأفقي أسفل الجدول لإظهار بقية الأعمدة.
  5. امسح حقلي البحث واضغط Search لإظهار قائمة الأجهزة مجددًا.

النتيجة المتوقعة: يعرض الجدول الجهاز الذي تريد إدارته.

نصيحة للاستخدام: يصف Enable حالة تفعيل سجل الجهاز، ويوضّح Online Status حالة اتصاله. اختر جهازًا بحالة Online لاستخدام التحكم المباشر.
03

DMS > Add Mac

مسؤولو الأجهزة المصرح لهم · 3 دقائق

جهّز بيانات تسجيل جهاز

جهّز تسجيل جهاز بالبيانات التي يزوّدك بها المسؤول.

  1. اضغط Add Mac في صفحة DMS.
  2. أدخل بيانات MAC المعتمدة في macs، وحدّد user وModel وArea بما يناسب مؤسستك.
  3. اختر mac type الصحيح: integrated machine أو audio device أو AI BOX، ثم اضبط State حسب التعليمات.
  4. أضف ملاحظة واضحة في Remark، وأدخل Order ID أو GPC Device ID عند الحاجة.
  5. راجع البيانات قبل الضغط على Submit. استخدم Cancel للخروج دون إرسال طلب التسجيل.

النتيجة المتوقعة: يحتوي نموذج التسجيل على بيانات الجهاز الجاهزة لمراجعة المسؤول.

نصيحة للاستخدام: استخدم المعرّفات المخصصة للجهاز الفعلي. راجع عنوان MAC بعناية واختر ملاحظة واضحة في Remark لتسهيل البحث عنه.

04

DMS > Device Control > BasicControl

مستخدمو الأجهزة المصرح لهم · 3 دقائق

اعرض شاشة الجهاز وصورة الفصل

استخدم screen_cut لفحص المحتوى المعروض على الجهاز، وReal Time Class Monitoring لعرض صورة كاميرا الفصل.

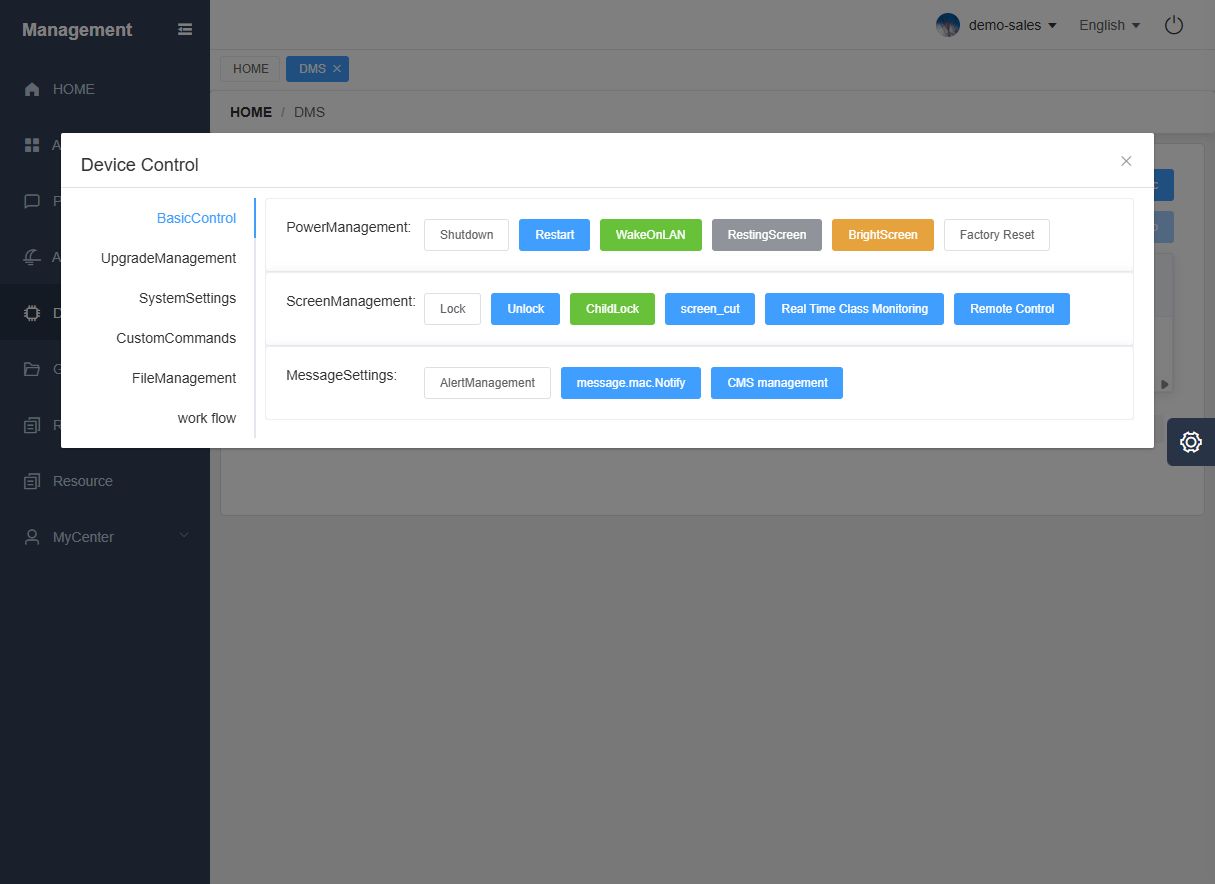
  1. اعثر على الجهاز المطلوب في DMS. راجع Device Mac وتأكد من ظهور Online في Online Status، ثم اضغط Device Control.
  2. افتح BasicControl وحدّد صف ScreenManagement.
  3. اضغط screen_cut لطلب لقطة من شاشة الجهاز. انتظر ظهور نافذة الصورة؛ يمكن أن تظهر رسالة استلام الأمر قبل ظهور اللقطة.
  4. افحص لقطة الشاشة، ثم أغلق نافذة الصورة من زر الإغلاق أعلى اليمين.
  5. اضغط Real Time Class Monitoring لطلب صورة كاميرا الفصل. انتظر نافذة الصورة، وراجع مشهد الكاميرا، ثم أغلقها.
  6. أكمل كل طلب وأغلق نافذة صورته قبل بدء الطلب التالي. أغلق Device Control عند الانتهاء.

النتيجة المتوقعة: يمكنك فحص شاشة الجهاز وصورة كاميرا الفصل بطلبين منفصلين.

نصيحة للاستخدام: يعرض screen_cut محتوى شاشة الجهاز، ويعرض Real Time Class Monitoring مشهد الكاميرا. استخدم الصورة المناسبة للمهمة، وانتظر الاستجابة قبل تكرار الطلب.
05

DMS > Device Control > BasicControl > message.mac.Notify

مستخدمو الأجهزة المصرح لهم · 2 دقائق

جهّز مسودة إشعار للجهاز

اكتب رسالة بعنوان واضح لعرضها على الجهاز.

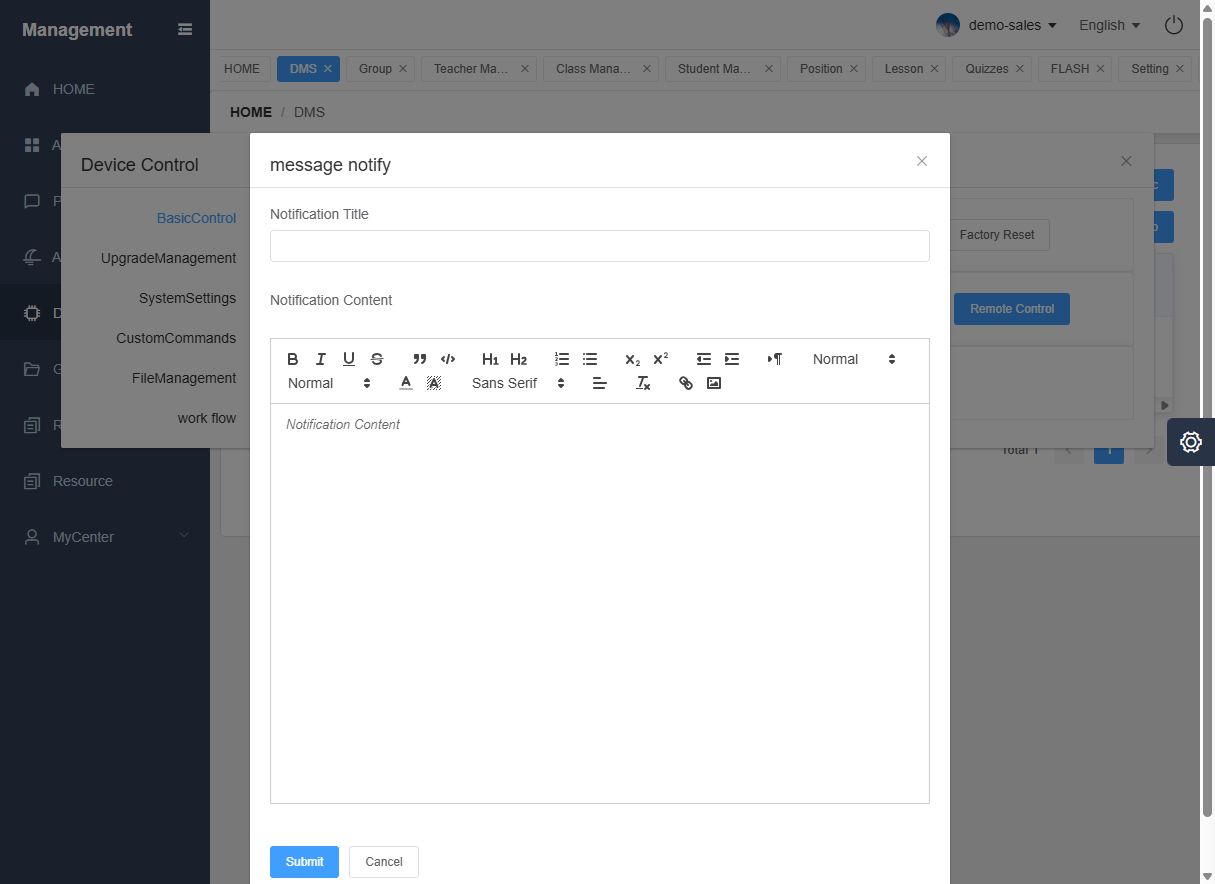
  1. افتح BasicControl للجهاز المقصود واختر message.mac.Notify.
  2. اكتب عنوانًا قصيرًا وواضحًا في Notification Title.
  3. اكتب الرسالة في Notification Content. استخدم أدوات المحرر لتنسيق النص وتسهيل قراءته.
  4. راجع العنوان والرسالة والجهاز المستهدف. استخدم Cancel للخروج من المحرر دون إرسال المسودة.

النتيجة المتوقعة: تصبح الرسالة جاهزة للإرسال إلى الجهاز المقصود.

نصيحة للاستخدام: اجعل العنوان محددًا والرسالة مختصرة. راجع الجهاز المحدد قبل تجهيز أي إعلان للفصل.
المجموعات والأتمتة

06

Group > Add / Config Device

مسؤولو الأجهزة المصرح لهم · 3 دقائق

جهّز مجموعة وقائمة أجهزتها

نظّم الأجهزة قبل استخدام أدوات التحكم الجماعي.

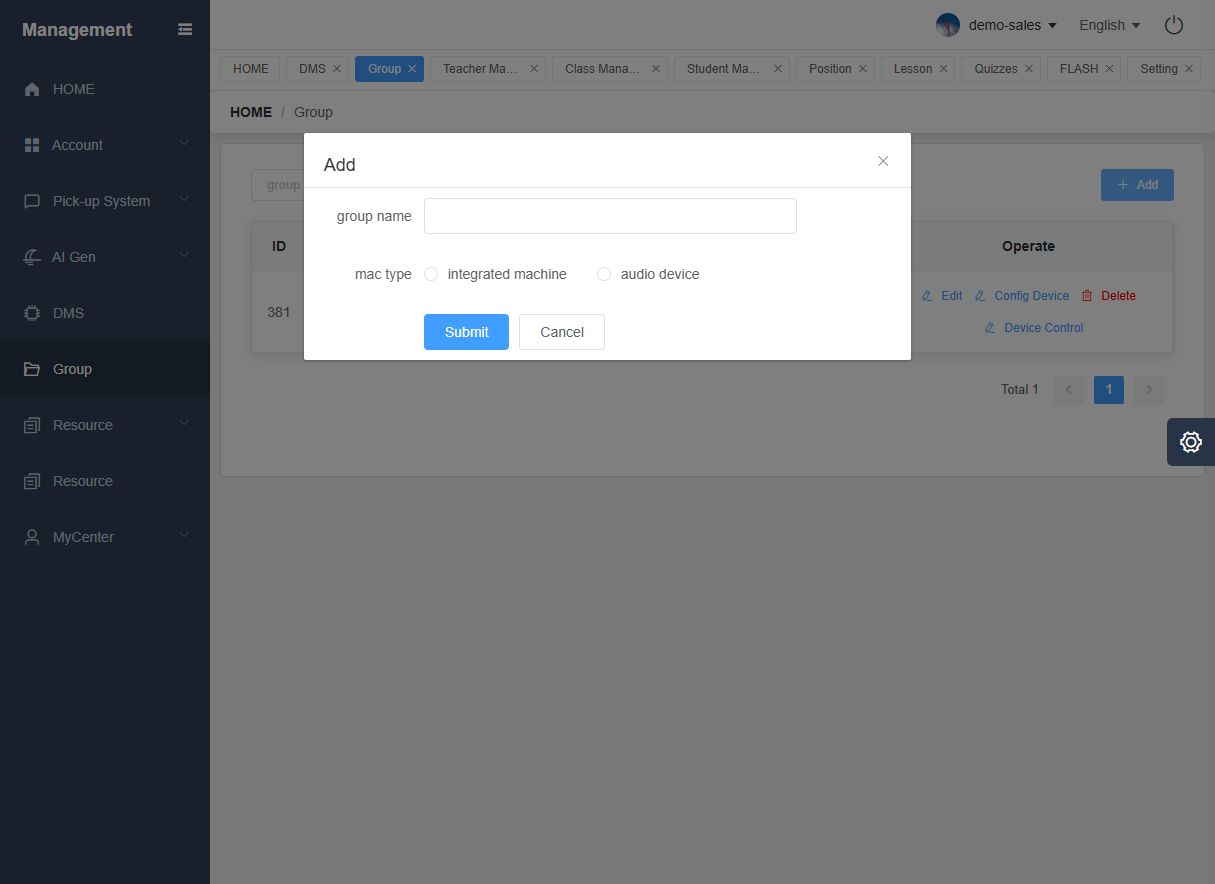
  1. افتح Group ثم اضغط Add.
  2. اكتب group name واضحًا واختر mac type المناسب: integrated machine أو audio device. راجع البيانات قبل الإرسال.
  3. من قائمة المجموعات، اضغط Config Device للمجموعة المقصودة.
  4. راجع قائمتي Not Selected Device وAlready Selected Device. استخدم التحديد وأزرار النقل لتجهيز الأجهزة المطلوب ضمّها.
  5. راجع القائمتين قبل الضغط على ConfirmingAssignments. أغلق النافذة إذا لم تكن تريد تغيير عضوية المجموعة.

النتيجة المتوقعة: تعرف كيفية تجهيز مجموعة وتحديد الأجهزة التابعة لها.

نصيحة للاستخدام: راجع قائمتي الأجهزة قبل حفظ العضوية. اختر اسمًا واضحًا للمجموعة مثل المبنى أو الطابق أو مجموعة الفصول.
07

DMS > select devices > Add Group

مسؤولو الأجهزة المصرح لهم · 2 دقائق

ابدأ مجموعة من الأجهزة المحددة

استخدم اختصار Add Group الذي يتفعّل بعد تحديد الأجهزة.

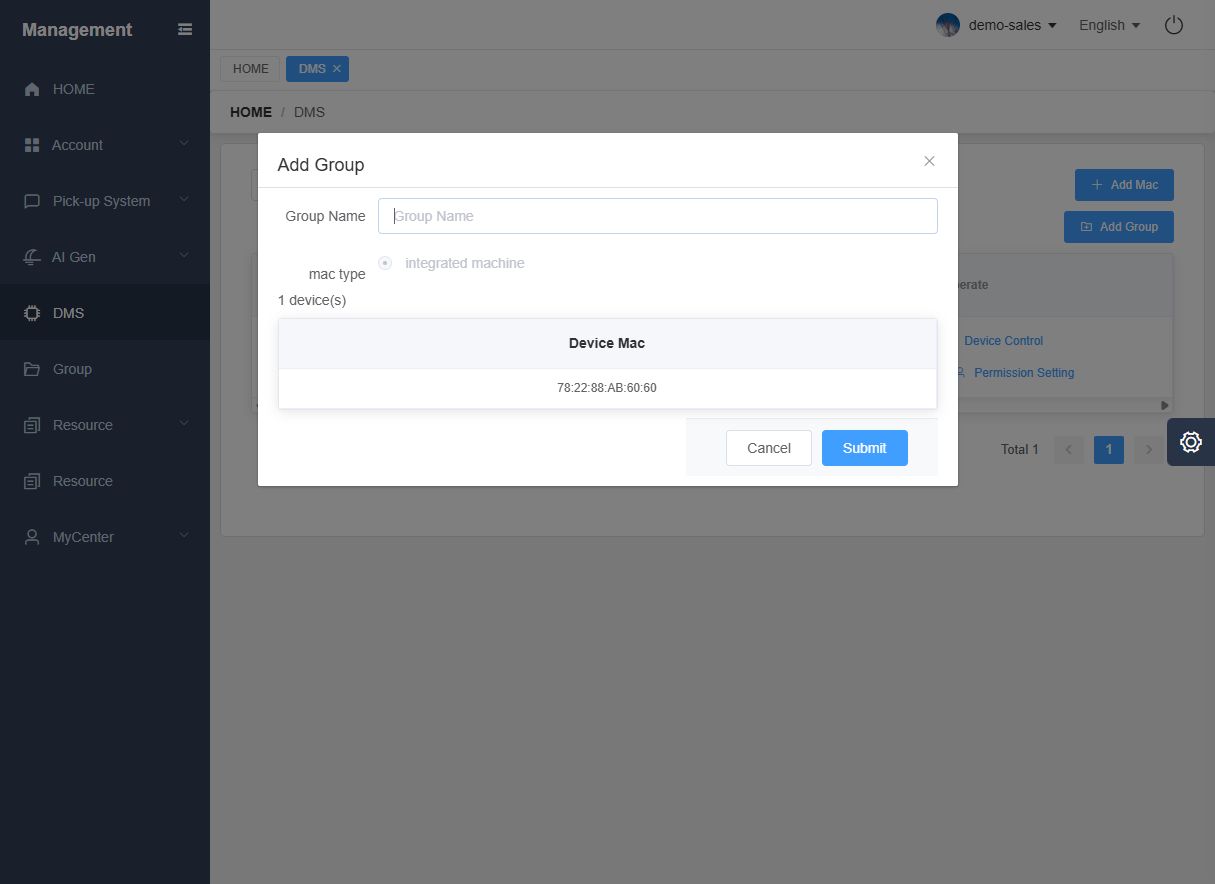
  1. افتح DMS وحدّد مربعات صفوف الأجهزة التي تريد تجميعها.
  2. اضغط Add Group. يصبح الزر متاحًا بعد تحديد جهاز.
  3. أدخل Group Name وراجع عناوين MAC وعدد الأجهزة الظاهرين.
  4. راجع النموذج قبل Submit. استخدم Cancel إذا لم تكن الأجهزة المحددة هي المقصودة.

النتيجة المتوقعة: يُجهّز نموذج مجموعة اعتمادًا على صفوف الأجهزة المحددة.

نصيحة للاستخدام: يفتح هذا الاختصار نموذج مجموعة اعتمادًا على صفوف الأجهزة المحددة. راجع عدد الأجهزة وعناوين MAC قبل المتابعة.
08

DMS > Permission Setting

المسؤولون المصرح لهم · 2 دقائق

راجع المستخدمين المسموح لهم بالوصول إلى الجهاز

اعثر على أدوات صلاحيات مستخدمي الجهاز.

  1. اعثر على الجهاز في DMS واضغط Permission Setting.
  2. راجع المستخدمين الظاهرين في mac permission setting وحالة تحديد كل منهم.
  3. اتبع سياسة الوصول في مؤسستك لتحديد المستخدمين الذين يجب السماح لهم.
  4. استخدم Submit فقط عند إجراء تغيير مصرح به. اضغط Cancel للإبقاء على الصلاحيات الحالية.

النتيجة المتوقعة: يمكنك الوصول إلى المستخدمين المعروضين في نموذج صلاحيات الجهاز.

نصيحة للاستخدام: صلاحيات الوصول إلى الجهاز من اختصاص المسؤول. راجع المستخدمين المقصودين وسياسة الوصول في مؤسستك قبل تغيير التحديد.

09

DMS > Device Control > work flow

مسؤولو الأجهزة المتقدمون · 3 دقائق

راجع سير العمل وتسلسل أوامره

اعثر على سير عمل محفوظ واقرأ قائمة أوامره بالترتيب.

  1. افتح تبويب work flow داخل Device Control. استخدم name وSearch للعثور على سير العمل.
  2. استخدم Edit لعرض الاسم والوصف. أغلق النموذج دون حفظ عندما تريد قراءته فقط.
  3. اضغط set cmd لفتح تسلسل الأوامر المحفوظ.
  4. اقرأ أسماء الأوامر ومعاملاتها بالترتيب، وقارن التسلسل بالمهمة المطلوبة.
  5. أغلق نافذة الأوامر بعد مراجعتها، واترك التسلسل المحفوظ كما هو أثناء التصفح.

النتيجة المتوقعة: يمكنك العثور على سير العمل وقراءة تسلسل أوامره المحفوظ.

نصيحة للاستخدام: اقرأ التسلسل كاملًا قبل إجراء أي تعديل. تعرض قائمة سير العمل ونافذة set cmd مستويين مختلفين من التفاصيل.

حسابات المدرسة

10

Account > Teacher Management

مسؤولو المدرسة المصرح لهم · 3 دقائق

ابحث عن حساب معلم وجهّز بياناته

اعثر على حسابات المعلمين ونماذج إعداد الحساب وبطاقة NFC.

  1. افتح Account > Teacher Management. استخدم teacher account وقائمة courseware_management ثم Search لتصفية النتائج.
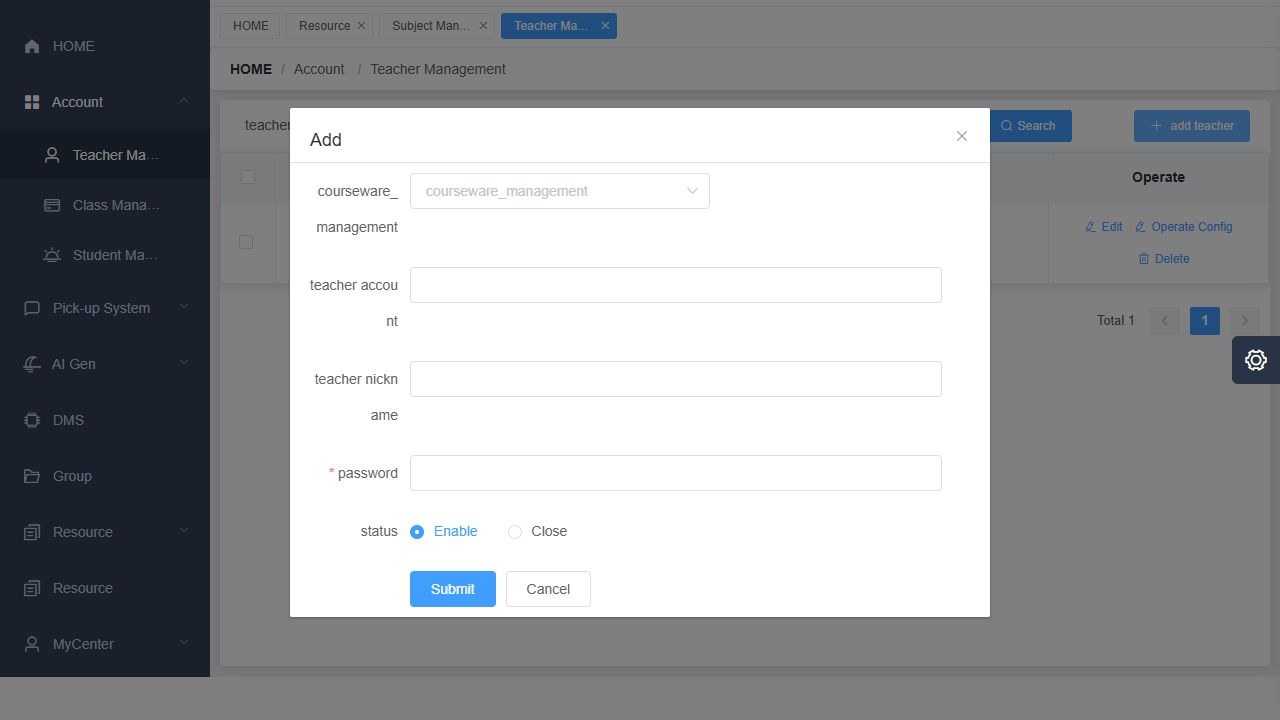
  2. اضغط add teacher لفتح نموذج الحساب.
  3. راجع courseware_management وteacher account وteacher nickname وpassword وstatus. يتولى المستخدم المسؤول إدخال بيانات الدخول بنفسه.
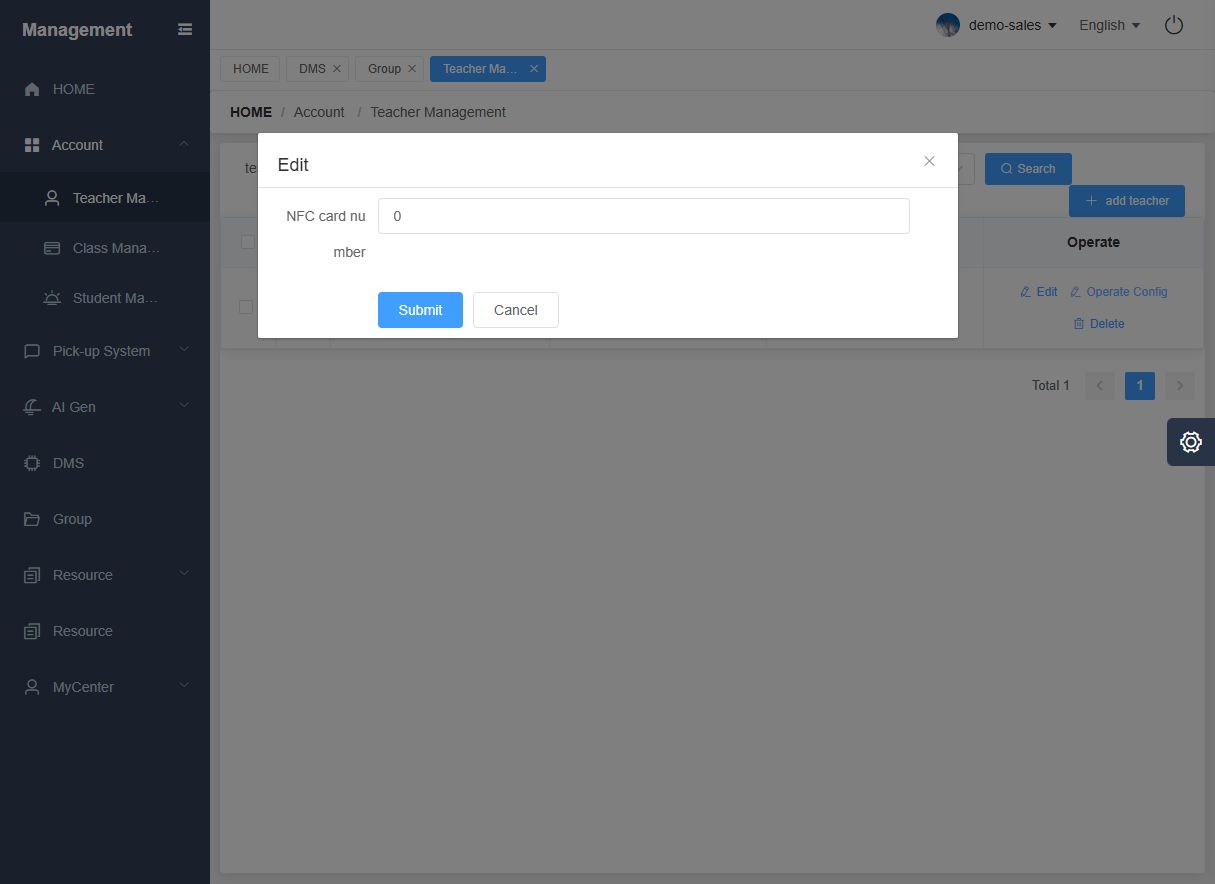
  4. استخدم Edit لبيانات حساب معلم موجود. يفتح Operate Config نموذجًا منفصلًا لرقم بطاقة NFC.
  5. أرسل التغيير المعتمد للحساب أو رقم NFC فقط. استخدم Cancel لمراجعة أي من النموذجين دون حفظ.

النتيجة المتوقعة: يمكنك العثور على إعداد حساب المعلم وحقل بطاقة NFC.

نصيحة للاستخدام: استخدم قيمة courseware_management التي يحددها مسؤول المدرسة. راجع حساب المعلم واسمه قبل تجهيز بيانات بطاقة NFC.
11

Account > Class Management

مسؤولو المدرسة المصرح لهم · 3 دقائق

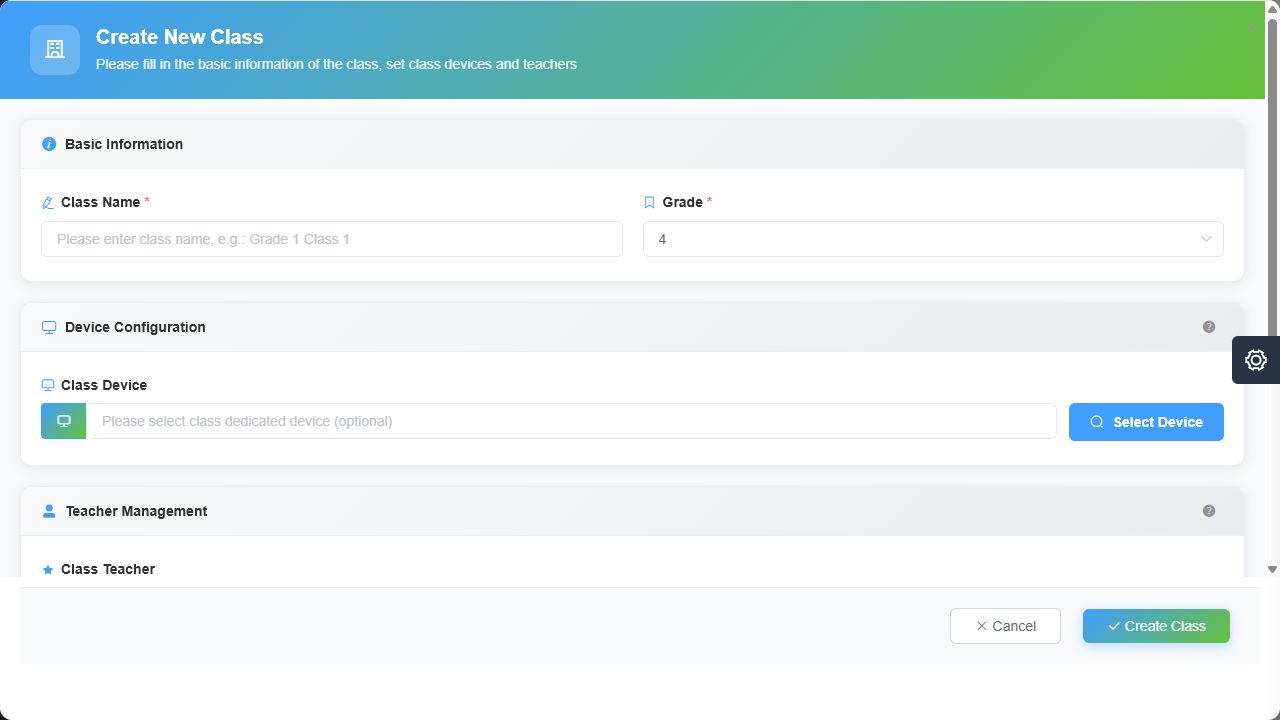
جهّز بيانات الصفوف والفصول

تعرّف على ترتيب إنشاء الصف الدراسي ثم الفصل التابع له.

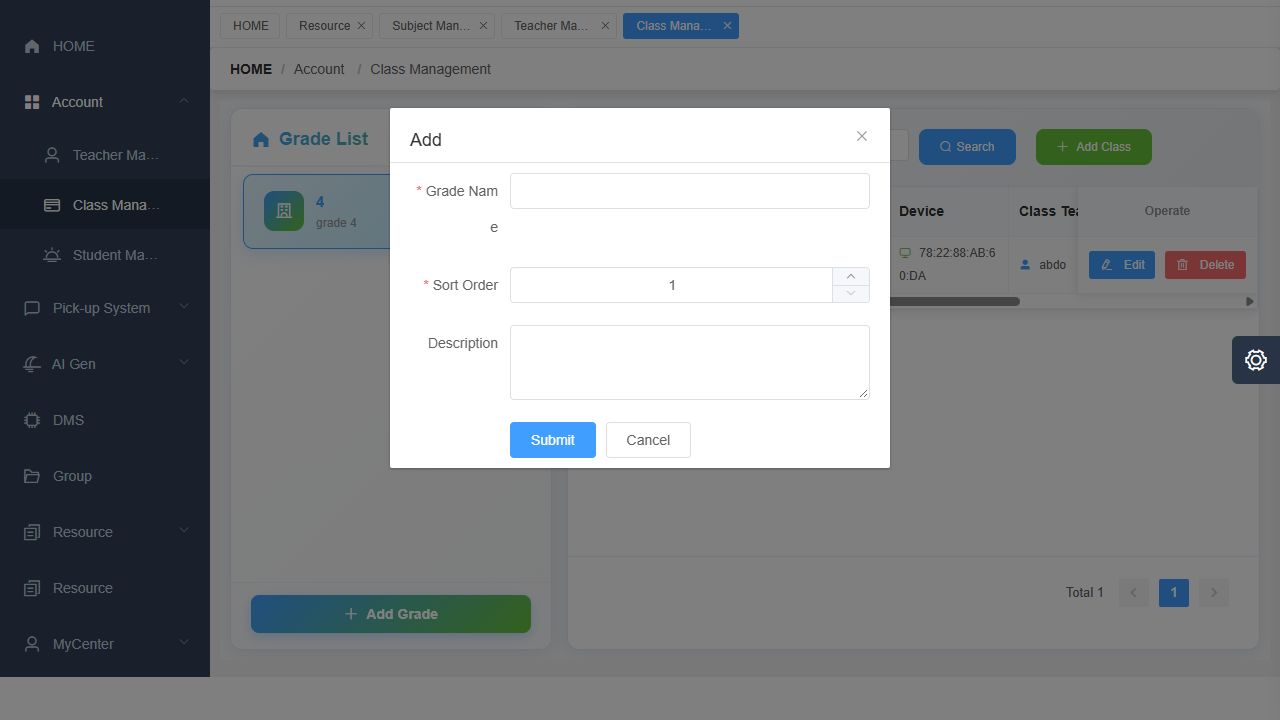
  1. افتح Account > Class Management وراجع Grade List على اليسار.
  2. استخدم Add Grade لتجهيز Grade Name وSort Order وDescription.
  3. اختر الصف الدراسي المطلوب ثم اضغط Add Class.
  4. اكتب Class Name وراجع Grade. يمكنك اختياريًا اختيار Class Device من Select Device وتحديد Class Teacher وإضافة Description.
  5. راجع التفاصيل قبل Create Class. استخدم البحث باسم الفصل والمعلم للعثور على فصل موجود.

النتيجة المتوقعة: يمكنك تجهيز فصل ضمن الصف الدراسي الصحيح.

نصيحة للاستخدام: Class Name وGrade حقلان مطلوبان. اختيار الجهاز والمعلم اختياري. راجع الصف الدراسي قبل إدخال بيانات الفصل.
12

Account > Student Management

مسؤولو المدرسة المصرح لهم · 3 دقائق

جهّز سجل طالب وولي أمره

اختر الفصل الصحيح قبل إدخال بيانات الطالب وولي الأمر.

  1. افتح Student Management وحدّد الصف الدراسي والفصل من اللوحة اليسرى.
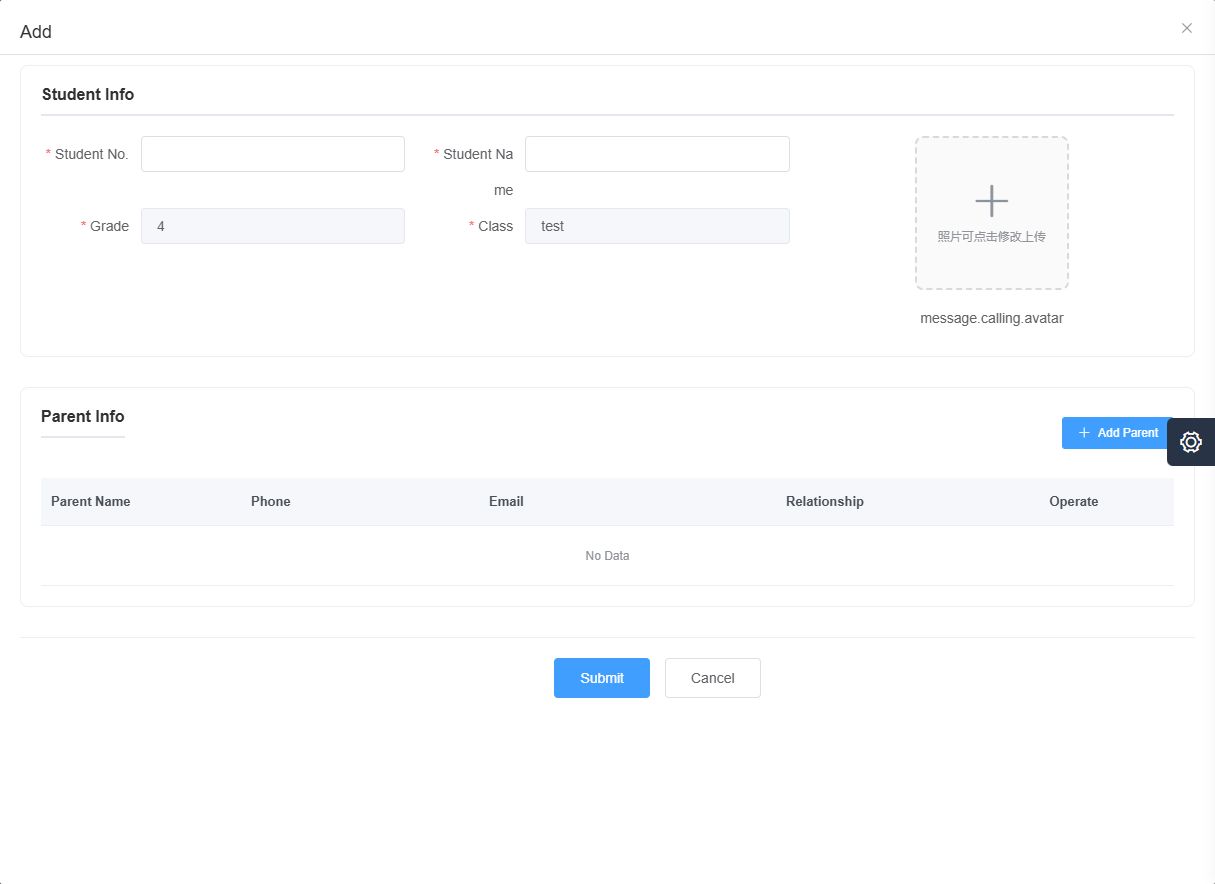
  2. استخدم Student No. أو Student Name مع Search للبحث. اضغط Add Student لتجهيز سجل جديد.
  3. أدخل Student No. وStudent Name، وراجع Grade وClass الظاهرين في النموذج قبل المتابعة.
  4. استخدم Add Parent لإدخال Parent Name وPhone وEmail الاختياري وRelationship. راجع بيانات ولي الأمر قبل إضافتها إلى النموذج.
  5. راجع سجل الطالب وبيانات ولي الأمر معًا. استخدم Cancel للخروج دون حفظ سجل جديد.

النتيجة المتوقعة: يمكن تجهيز سجل الطالب للفصل الصحيح مع بيانات ولي الأمر المناسبة.

نصيحة للاستخدام: راجع الصف والفصل ورقم الطالب وصلة القرابة معًا لتجنب تجهيز السجل في فصل غير مقصود.
13

Pick-up System > Position

مسؤولو المدرسة المصرح لهم · 2 دقائق

جهّز موقع استلام الطلاب

اعثر على قائمة مواقع الاستلام ونموذج إعدادها.

  1. افتح Pick-up System > Position.
  2. استخدم Position Name أو Address ثم Search للبحث عن موقع.
  3. اضغط Add Position. راجع courseware_management، وأدخل Position المطلوب، وأضف Address وThumbnail عند الحاجة.
  4. راجع البيانات قبل Submit، أو اضغط Cancel للخروج دون إنشاء موقع.

النتيجة المتوقعة: يمكنك تجهيز سجل لموقع استلام الطلاب.

نصيحة للاستخدام: استخدم اسم موقع واضحًا وعنوانًا كاملًا. اختر صورة مصغرة تساعد الموظفين على التعرف على المكان.

أدوات الذكاء الاصطناعي

14

AI Gen > Lesson

مستخدمو المحتوى التعليمي · 3 دقائق

أنشئ درسًا بالذكاء الاصطناعي

أنشئ درسًا وراجعه انطلاقًا من طلب تعليمي قصير.

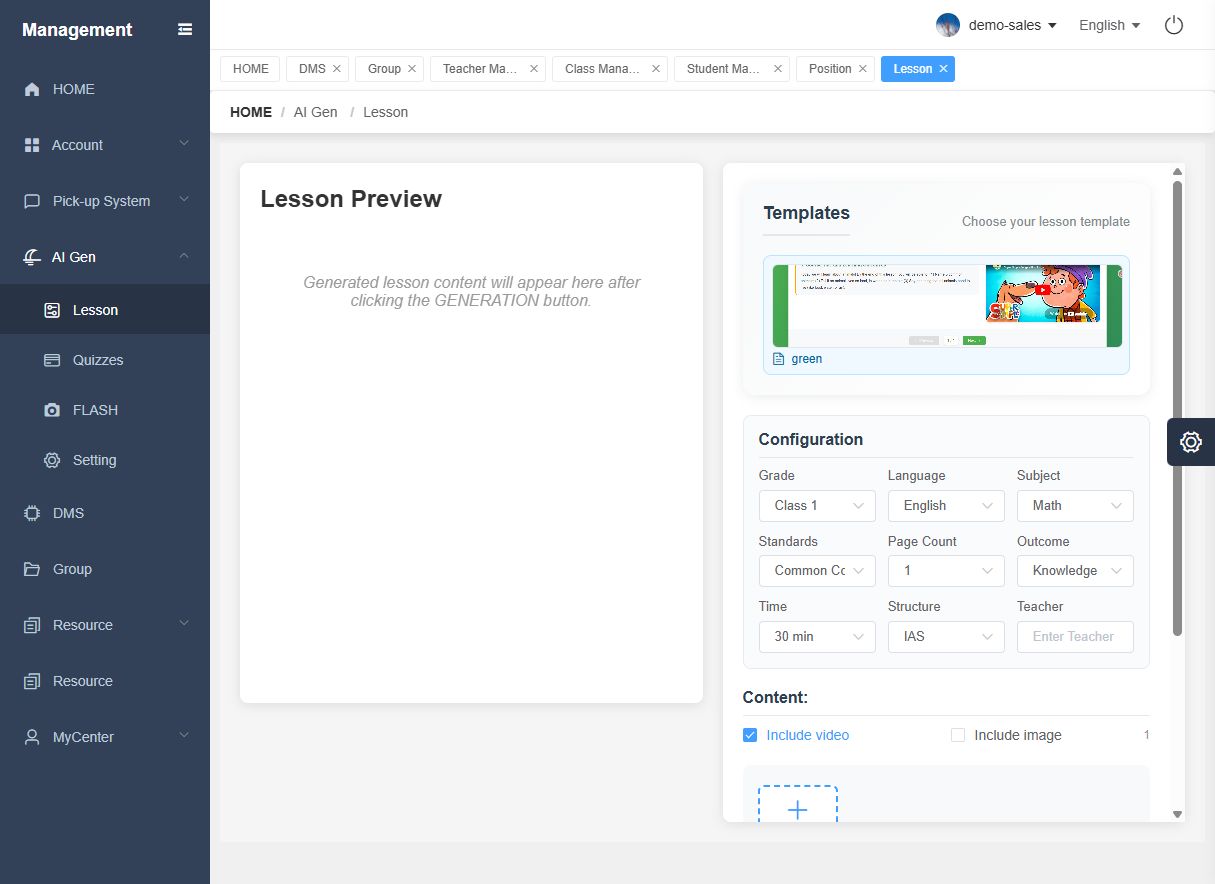
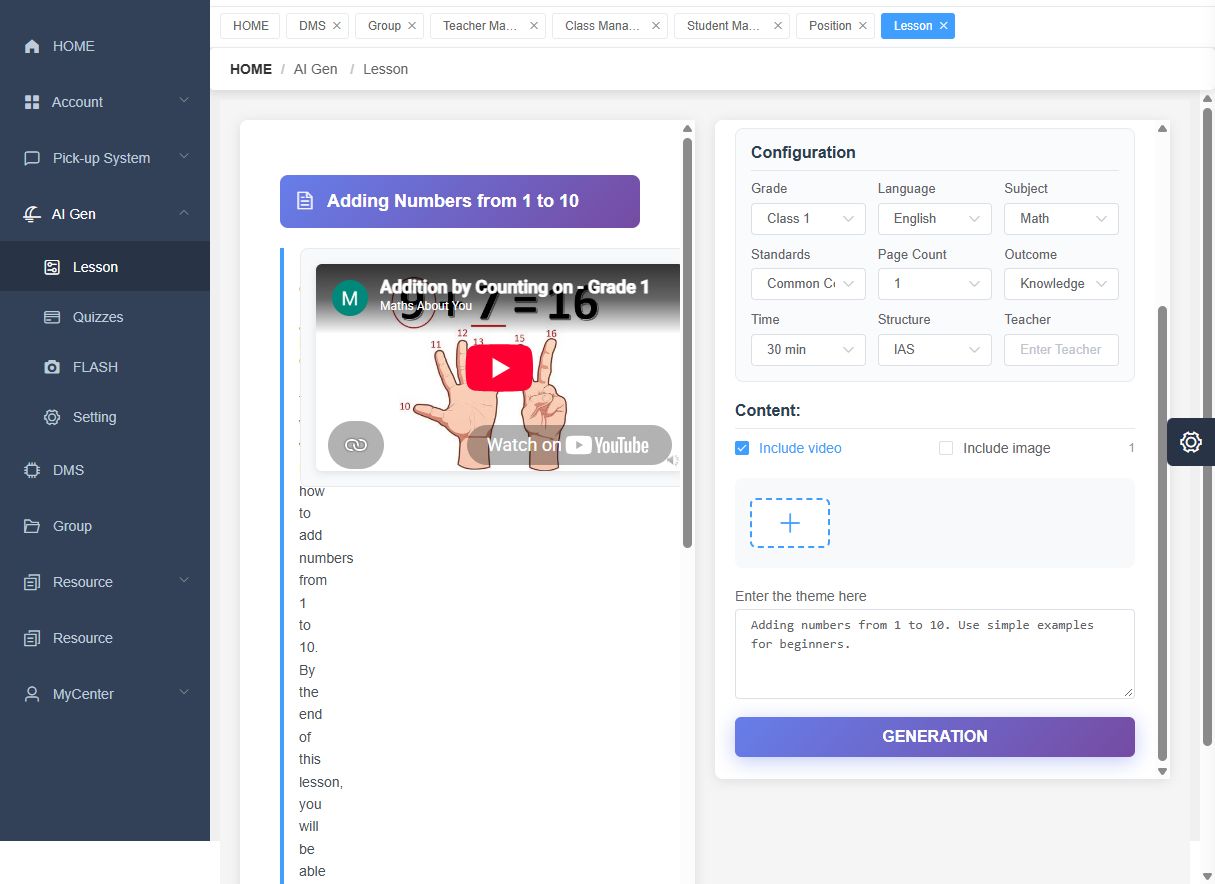
  1. افتح AI Gen > Lesson وراجع القالب المتاح.
  2. حدّد Grade وLanguage وSubject وStandards وPage Count وOutcome وTime وStructure. أضف Teacher عند الحاجة.
  3. اختر تضمين فيديو أو صورة حسب المطلوب، ثم اكتب موضوعًا محددًا في مساحة الطلب.
  4. اضغط GENERATION وانتظر المعاينة. راجع جميع الصفحات أو الأقسام وتحقّق من المحتوى التعليمي.
  5. اضغط Save HTML لحفظ الناتج، ثم افتح مدخل Resource السفلي > AiCloud(owner) > lesson للتحقق من وجود الملف المحفوظ.

النتيجة المتوقعة: يظهر الدرس في المعاينة ويمكن حفظه داخل AiCloud.

نصيحة للاستخدام: مثال لموضوع الدرس: جمع الأعداد من 1 إلى 10 باستخدام أمثلة بسيطة للمبتدئين. اقرأ أقسام المعاينة كاملة وراجع محتواها قبل الحفظ.
15

AI Gen > Quizzes

مستخدمو المحتوى التعليمي · 3 دقائق

أنشئ اختبارًا وراجع إجاباته

جهّز أسئلة الاختبار وراجع الإجابات قبل استخدامها مع الطلاب.

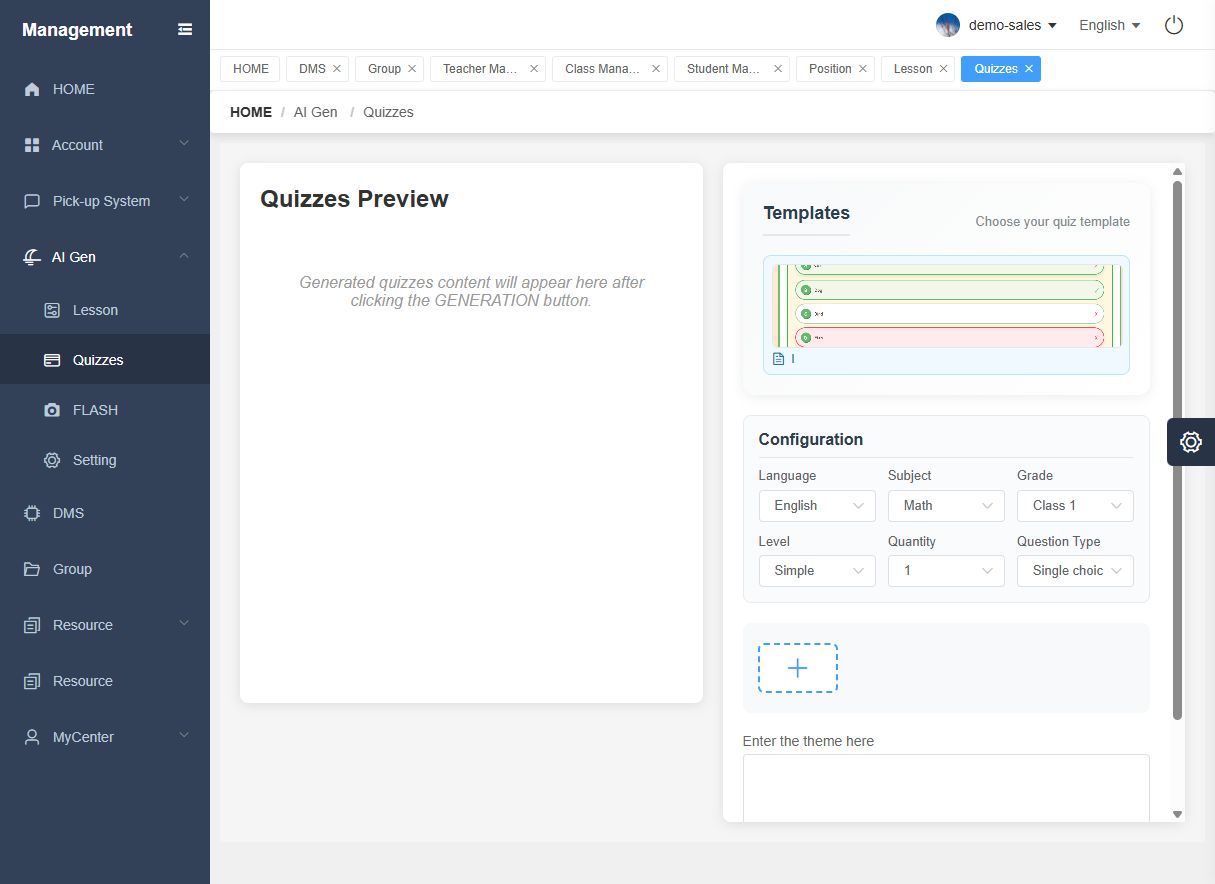
  1. افتح Quizzes وراجع القالب.
  2. اختر Language وSubject وGrade وLevel وQuantity وQuestion Type.
  3. اكتب الموضوع ثم اضغط GENERATION.
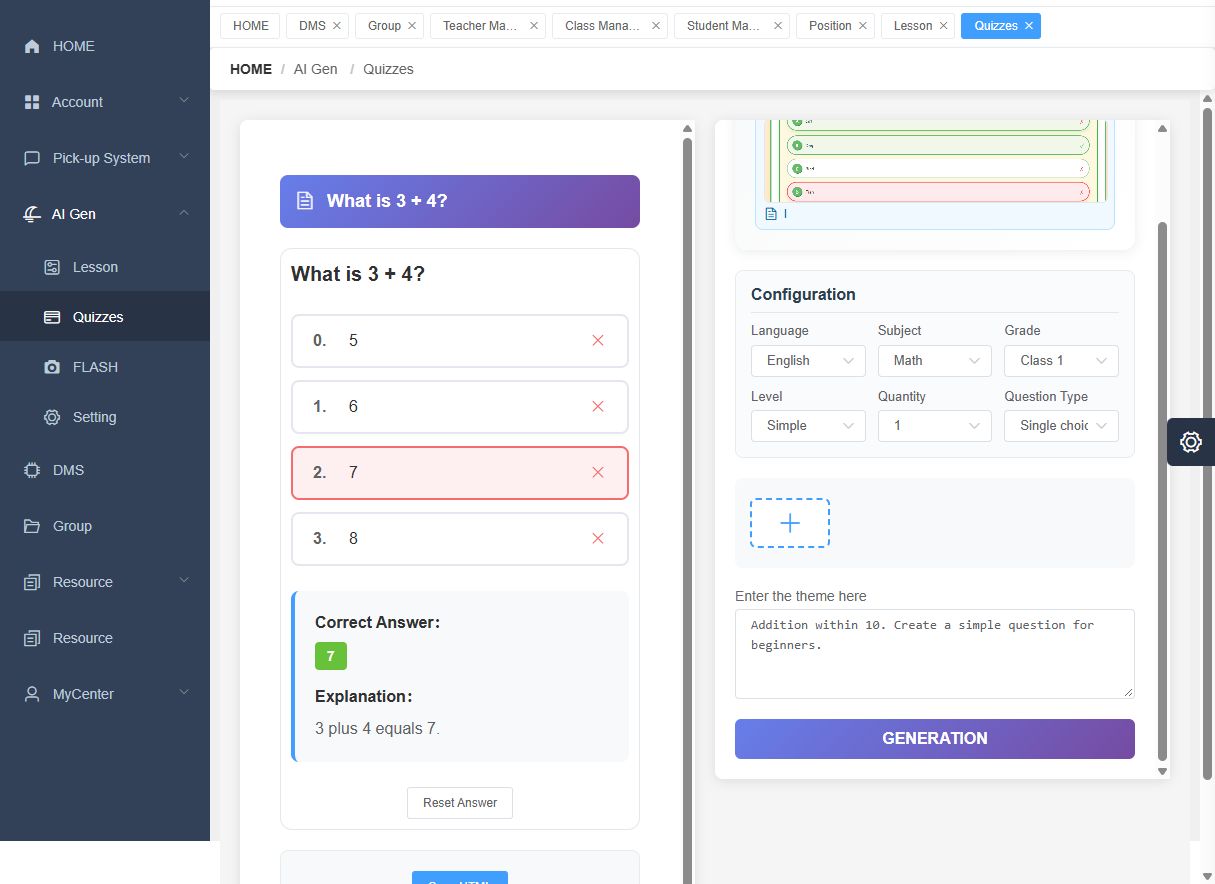
  4. راجع السؤال والاختيارات. استخدم Check Answer لإظهار الإجابة الصحيحة والشرح، وReset Answer للمحاولة من جديد.
  5. راجع جميع الأسئلة المولّدة وشروحها قبل استخدام الاختبار في الدرس.

النتيجة المتوقعة: تتوفر معاينة للاختبار تستطيع مراجعتها قبل الاستخدام.

نصيحة للاستخدام: راجع كل سؤال وإجابته وشرحه قبل الاستخدام في الفصل. أعد توليد السؤال الذي يحتاج تصحيحًا ثم راجعه مجددًا.
16

AI Gen > FLASH

مستخدمو المحتوى التعليمي · 2 دقائق

أنشئ بطاقات تعليمية

أنشئ مجموعة قصيرة من البطاقات التعليمية.

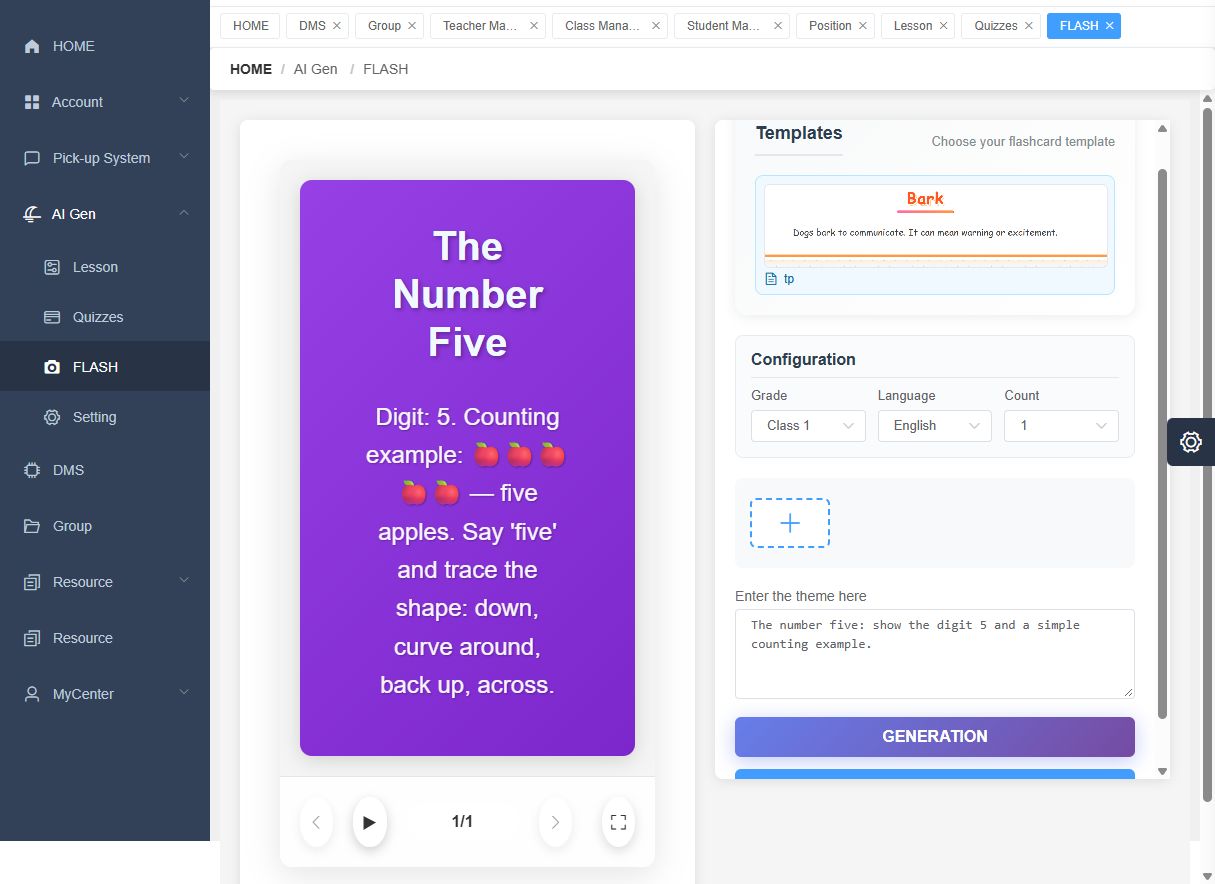
  1. افتح FLASH وراجع قالب البطاقة.
  2. اختر Grade وLanguage وCount.
  3. اكتب الموضوع ثم اضغط GENERATION.
  4. راجع نص البطاقة المولّدة وأرقامها وأمثلتها داخل المعاينة.
  5. اضغط Save HTML وتحقّق من الملف المحفوظ داخل مدخل Resource السفلي > AiCloud(owner) > flashcard.

النتيجة المتوقعة: تظهر البطاقة في المعاينة ويمكن حفظها في AiCloud.

نصيحة للاستخدام: خصص فكرة تعليمية واحدة لكل بطاقة، وراجع الصياغة والأرقام والأمثلة قبل الحفظ.
17

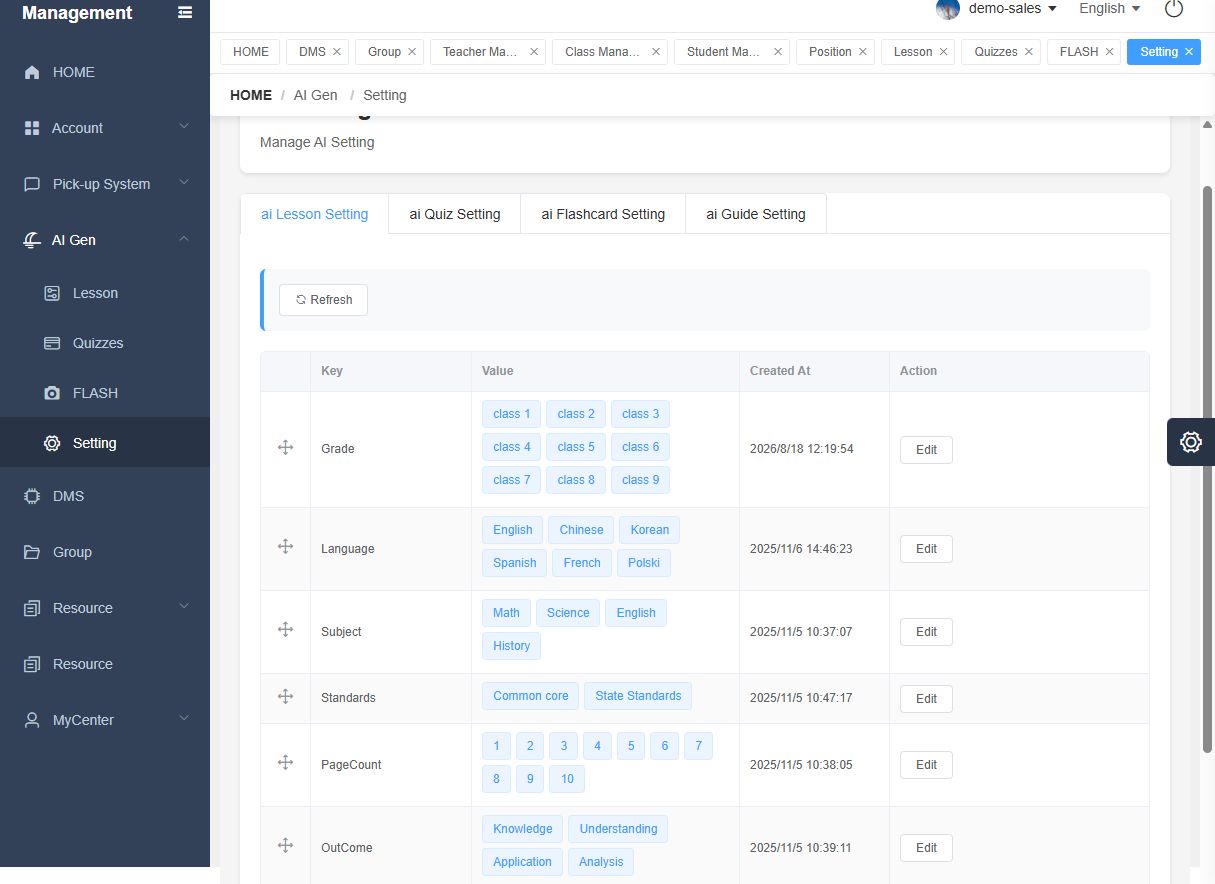
AI Gen > Setting

مسؤولو المحتوى المصرح لهم · 2 دقائق

راجع خيارات إعداد الذكاء الاصطناعي

اعثر على قوائم القيم المستخدمة في نماذج التوليد.

  1. افتح AI Gen > Setting.
  2. اختر ai Lesson Setting أو ai Quiz Setting أو ai Flashcard Setting أو ai Guide Setting.
  3. راجع كل Key وقائمة Value التابعة له، مثل اللغات والصفوف والمواد والأعداد وأنواع الأسئلة.
  4. استخدم Edit عندما تكون مخوّلًا لتعديل الخيارات المتاحة فقط. استخدم Refresh لإعادة تحميل القائمة.

النتيجة المتوقعة: يمكنك العثور على قوائم الخيارات التي تعتمد عليها نماذج التوليد.

نصيحة للاستخدام: تنظّم هذه التبويبات الخيارات المستخدمة في نماذج التوليد. حدّد نوع المحتوى المناسب قبل فتح قائمة الخيارات.
الموارد

18

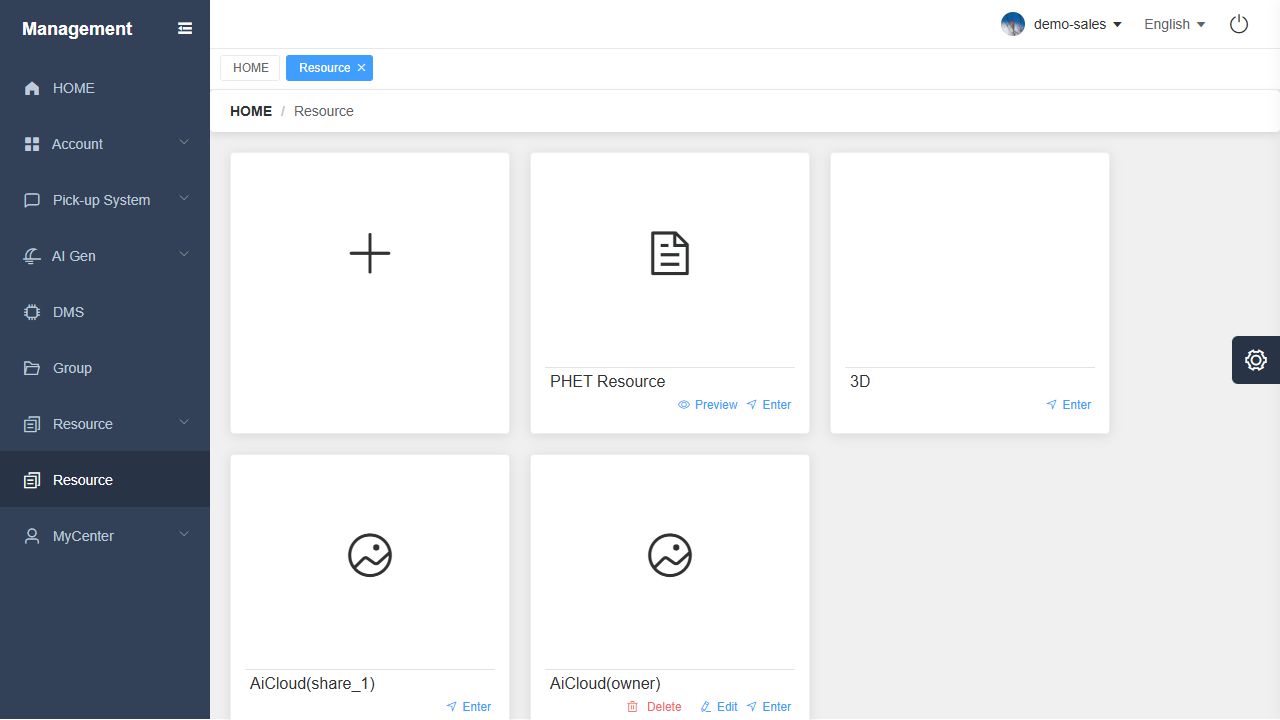
Lower Resource entry

مستخدمو الموارد · 3 دقائق

تصفّح فهارس PHET و3D والمجلدات السحابية

اختر وحدة الموارد المناسبة للمهمة.

  1. اختر مدخل Resource السفلي من القائمة الجانبية لفتح بطاقات الوحدات.
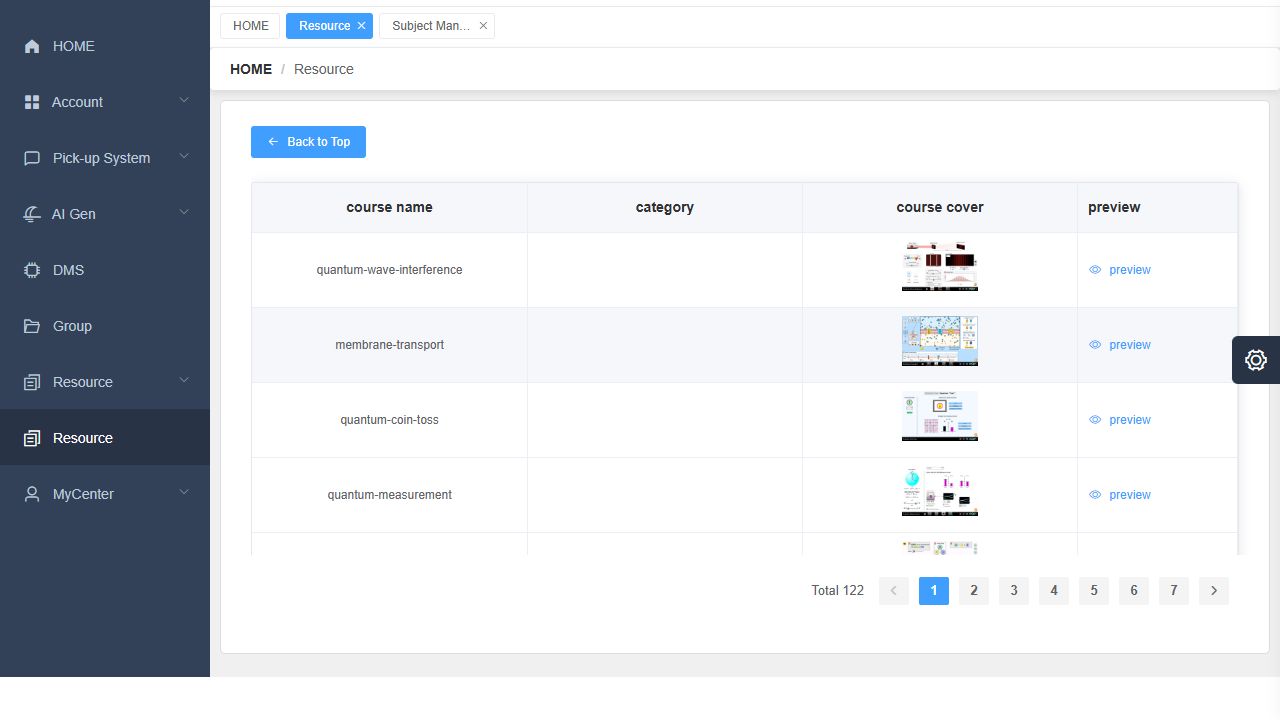
  2. اضغط Enter في PHET Resource لتصفّح فهرس المحاكاة، واستخدم أرقام الصفحات لاستعراض بقية العناصر.
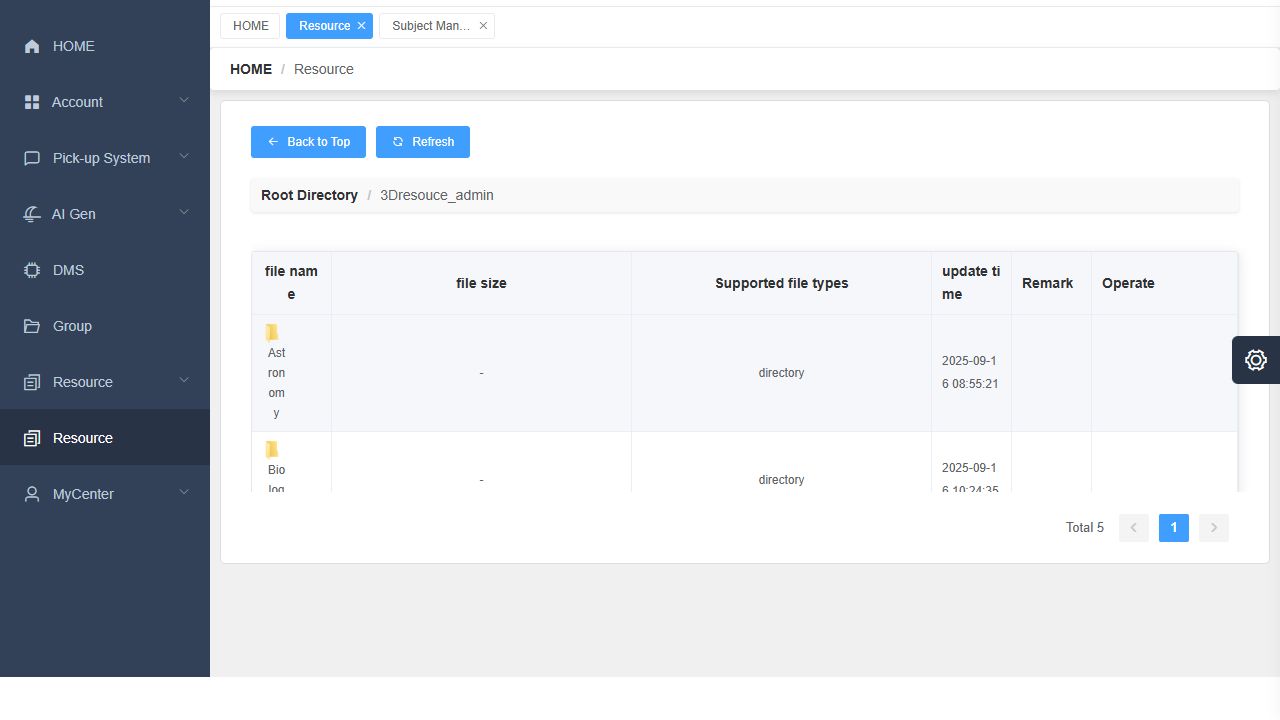
  3. اضغط Enter في 3D لتصفّح مجلدات المواد مثل Astronomy وBiology وChemical وGeograph وPhysics.
  4. انقر على المجلد مرتين لفتحه. لتصفح ملفات نماذج الكواكب، افتح Astronomy > Planet > Terrestrial planet.
  5. اختر AiCloud(owner) لموارد حسابك أو بطاقة سحابية مشتركة متاحة للمواد المشتركة. استخدم Back to Top للعودة إلى بطاقات الوحدات.

النتيجة المتوقعة: يمكنك الانتقال من فهرس الوحدات إلى مجموعة الموارد المطلوبة.

نصيحة للاستخدام: اختر مجموعة الموارد من بطاقات الوحدات، ثم استخدم أرقام الصفحات أو المجلدات لتصفحها. يوضّح شريط المسار المجلد الحالي.
19

Lower Resource entry > AiCloud(owner)

مالكو الموارد · 3 دقائق

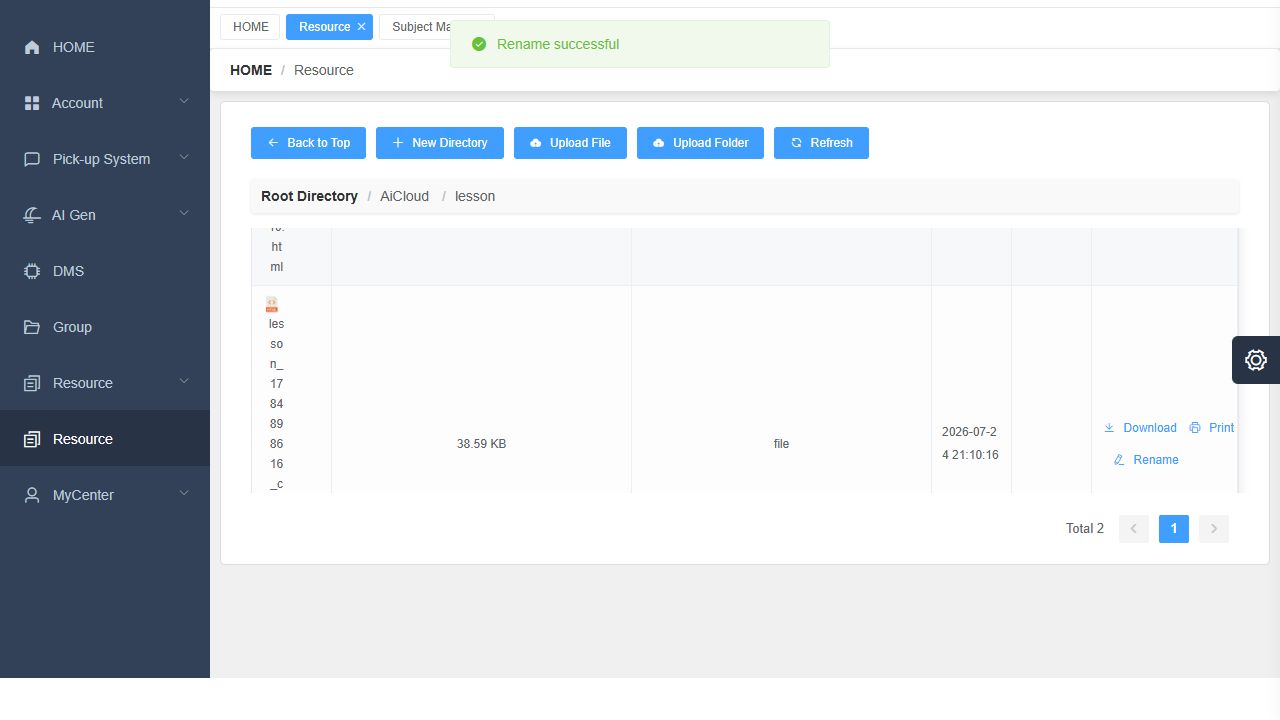
نظّم ملفاتك داخل AiCloud

اعثر على المحتوى المُولّد المحفوظ وتعرّف على إجراءات الملفات.

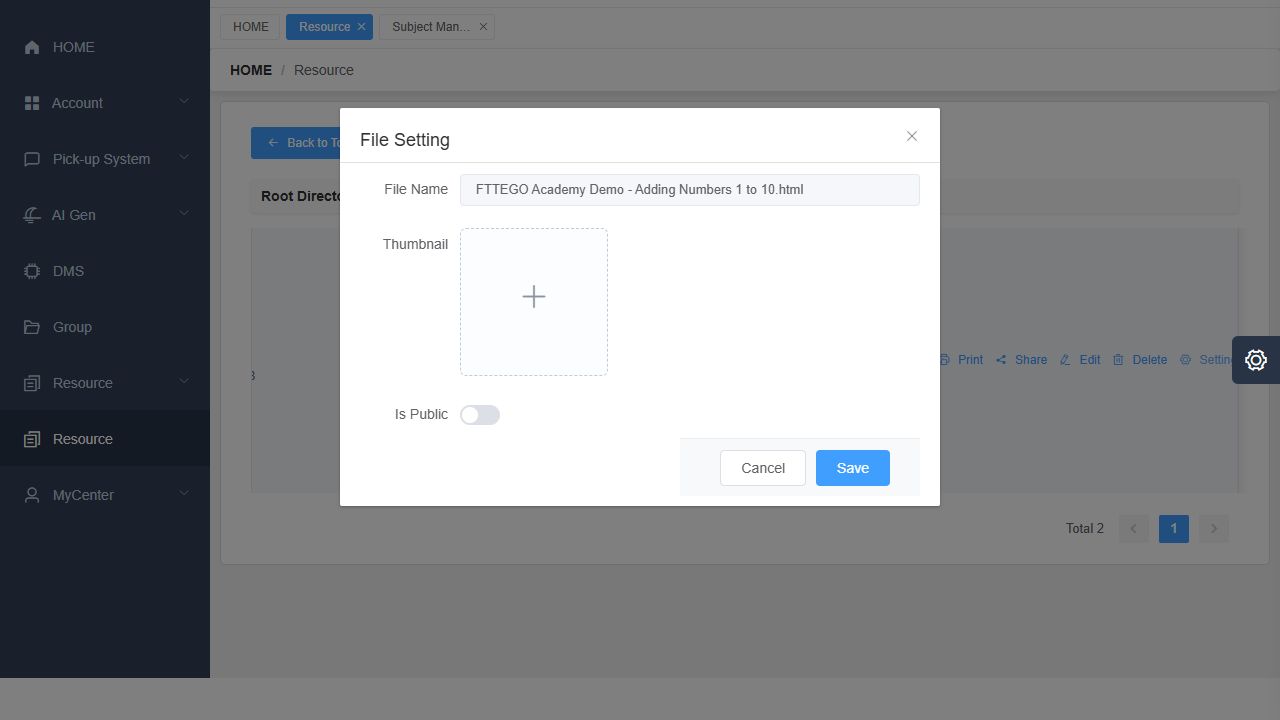
  1. افتح AiCloud(owner). انقر مرتين على lesson أو flashcard لفتح المجلد، واستخدم شريط المسار أو صف المجلد الأب للرجوع.
  2. اعثر على الدرس أو البطاقة المحفوظة بالاسم داخل قائمة الملفات.
  3. اضغط Rename لملف تملكه. أدخل New File Name مع الحفاظ على امتداده، ثم اضغط Confirm.
  4. راجع الاسم الجديد في القائمة. استخدم أسماء واضحة تحدد المادة والموضوع التعليمي.
  5. افتح Setting لمراجعة Thumbnail وIs Public. أغلق النموذج دون تغيير الوصول عندما تريد الاطلاع عليه فقط.

النتيجة المتوقعة: يمكنك الوصول إلى المحتوى المحفوظ وتنظيم الملفات التي تملكها.

نصيحة للاستخدام: يحفظ Save HTML الدروس والبطاقات داخل AiCloud. افتح المجلد المطابق للعثور على الملف؛ الحفظ السحابي إجراء منفصل عن تنزيل الملف في المتصفح.
20

Expandable Resource > Subject Management

مسؤولو الموارد المصرح لهم · 2 دقائق

اعثر على تصنيفات المواد

ميّز بين إدارة تصنيفات المواد وفهرس وحدات الموارد.

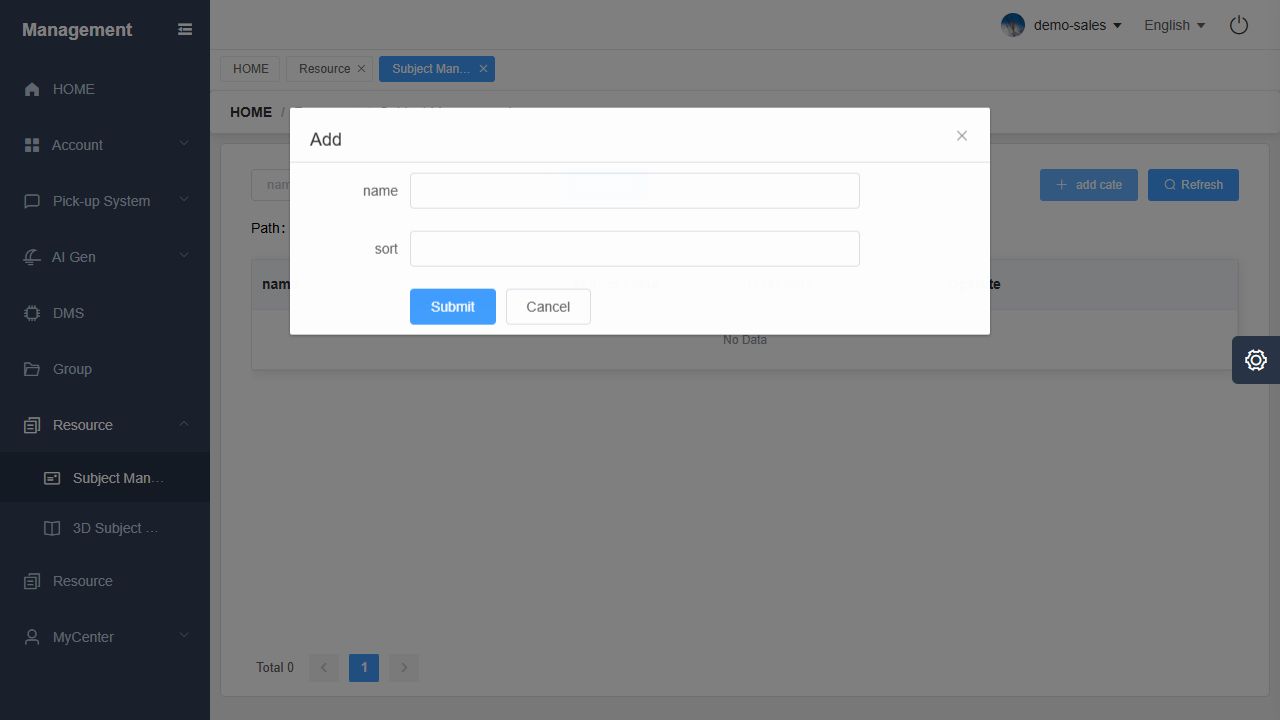
  1. وسّع قائمة Resource العلوية واختر Subject Management.
  2. استخدم name وSearch للبحث عن تصنيف، أو Refresh لإعادة تحميل القائمة.
  3. استخدم add cate لتجهيز name وقيمة sort للتصنيف.
  4. راجع Path المعروض قبل إرسال التصنيف. استخدم Cancel إذا كنت تستكشف النموذج فقط.

النتيجة المتوقعة: يمكنك الوصول إلى قائمة تصنيفات المواد ونموذج الإضافة.

نصيحة للاستخدام: ينظّم Subject Management أسماء التصنيفات وقيم ترتيبها. استخدم بطاقات وحدات Resource المنفصلة لتصفح مكتبة الموارد.
حسابي

21

MyCenter > Setting

مستخدمو الحساب؛ إعداد البريد بمعرفة المسؤول · 3 دقائق

اعثر على إعدادات الحساب والبريد

اعثر على بيانات ملفك الشخصي وحقول إعداد خادم البريد.

  1. افتح MyCenter > Setting، أو اختر Personal Settings من قائمة الحساب.
  2. في BasicSettings، راجع UserName وRealName واختيار Country الاختياري.
  3. افتح Security Email للوصول إلى Email وEmail Password وEmail Port وEmail Host وEmail From.
  4. احصل على بيانات خادم البريد من المسؤول. أغلق النموذج دون حفظ عندما تريد الاطلاع على الحقول فقط.

النتيجة المتوقعة: يمكنك الوصول إلى القسم المناسب لإعداد الحساب أو البريد.

نصيحة للاستخدام: يحتوي Security Email على إعدادات خادم البريد والمرسل. استخدم بيانات خادم البريد المعتمدة في مؤسستك لهذه الحقول.

المساعدة والأسئلة الشائعة

لماذا يظهر Enable مع أن الجهاز غير متاح؟

راجع Online Status بشكل منفصل؛ يصف Enable حالة تفعيل السجل. تحقق من طاقة الجهاز واتصاله بالشبكة ثم أعد البحث.

لماذا لا يتفعّل Add Group؟

حدّد صف جهاز واحد على الأقل داخل DMS، ثم افتح Add Group وراجع قائمة الأجهزة المحددة.

كيف أبحث عن جهاز معين؟

أدخل Device Mac كاملًا في Please enter deviceId، وامسح مرشح Remark غير المستخدم، ثم اضغط Search. يمكنك أيضًا البحث بالملاحظة في Remark.

أين يحفظ Save HTML الدروس والبطاقات؟

افتح مدخل Resource المنفصل ثم AiCloud(owner)، وادخل مجلد lesson أو flashcard. يحفظ Save HTML الملف في السحابة.

ما الفرق بين screen_cut ومراقبة الفصل؟

يعرض screen_cut لقطة من شاشة الجهاز، ويعرض Real Time Class Monitoring صورة كاميرا الفصل. أغلق نافذة كل طلب قبل بدء الطلب التالي.

لماذا تبدو القائمة فارغة؟

راجع الصف والفصل والمجلد ومرشحات البحث المحددة. استخدم Search أو Refresh حيث يتوفران، وانتظر انتهاء التحميل.

كيف أراجع المحتوى التعليمي المولّد بالذكاء الاصطناعي؟

اقرأ الأقسام المولّدة كاملة، وراجع المعلومات والصياغة والإجابات والشروح قبل الاستخدام. أعد توليد المحتوى الذي يحتاج تصحيحًا.

كيف أتصفح النموذج دون تغيير البيانات؟

افتح النموذج واقرأ حقوله ثم اضغط Cancel أو زر الإغلاق. استخدم Submit عندما تريد حفظ البيانات أو إرسال الإجراء فقط.

FTTEGO DMS Academy | دليل الاستخدام بالصور. تتحدد الأقسام المتاحة حسب صلاحيات حسابك. استخدم زر اللغة للتبديل بين العربية والإنجليزية.
DMS Academy
Open DMS ↗
FTTEGO DMS Academy

Learn FTTEGO DMS, step by step.

A practical, illustrated guide to finding devices, viewing screen and classroom images, preparing school forms, creating teaching content, and organizing cloud files. Choose a task and follow its steps.

21 short lessons · English · Reviewed 19 October 2026
A useful first session
  1. Find your device and check its status.
  2. Generate a sample lesson and review its content.
  3. Find the saved file in AiCloud.

Choose a task. Follow the steps.

Button names match the English interface. Expand the sidebar, scroll wide tables, and scroll within long forms when needed. Select a screenshot to inspect it at its original size.

No lessons match this search. Try a button name or a shorter phrase.

Start here

01

HOME

All users · 2 min

Find your way around

Understand the main parts of the workspace before you start.

  1. Open dms.fttego.com and sign in with your assigned account.
  2. Use the top-left menu icon to expand the sidebar. Select HOME to return to the dashboard.
  3. Use the sidebar to open the section you need, such as DMS, Group, Account, AI Gen, Resource, or MyCenter.
  4. Use the tabs across the top to return to an open page. The breadcrumb below them shows your current location.
  5. Use the language menu at the top right to change the web interface language. Open Personal Settings from the account menu for your profile.

What to expect: You can open the module you need and return to HOME.

Useful tip: The sections shown depend on your account permissions. The expandable Resource menu contains subject categories; the separate Resource entry opens the resource modules.

Devices

02

DMS

Device users · 2 min

Find a device and read its status

Locate the correct device before opening its controls.

  1. Select DMS in the sidebar.
  2. Enter the complete Device Mac in Please enter deviceId, or enter a device note in Remark.
  3. Select Search. Clear an unused search field so that it does not restrict the results.
  4. Check Device Mac, Model, State, and Online Status. Drag the horizontal scrollbar below the table to reveal more columns.
  5. Clear the search fields and select Search to show the device list again.

What to expect: The table shows the device you want to manage.

Useful tip: Enable describes the device registration state. Online Status shows its connection. Select an Online device for live controls.

03

DMS > Add Mac

Authorized device managers · 3 min

Prepare a device registration

Prepare a device registration using the information supplied by your administrator.

  1. Select Add Mac from the DMS page.
  2. Enter the supplied MAC information in macs. Use the assigned user, Model, and Area selections for your organization.
  3. Choose the matching mac type: integrated machine, audio device, or AI BOX. Set State as instructed.
  4. Add a useful Remark and any applicable Order ID or GPC Device ID.
  5. Review the details before selecting Submit. Use Cancel to leave without submitting a registration.

What to expect: The registration form contains the device details ready for the administrator to review.

Useful tip: Use the identifiers supplied for the actual device. Check the MAC address carefully and choose a clear Remark for later searches.

04

DMS > Device Control > BasicControl

Authorized device users · 3 min

View the device screen and classroom image

Use screen_cut to inspect the displayed content and Real Time Class Monitoring to view the classroom camera image.

  1. Find the intended device in DMS. Check its Device Mac and confirm that Online Status is Online, then select Device Control.
  2. Open BasicControl and locate the ScreenManagement row.
  3. Select screen_cut to request a screenshot of the device display. Wait for the image window to appear; the command acknowledgement can appear before the image.
  4. Inspect the displayed screenshot, then close its image window using the top-right close button.
  5. Select Real Time Class Monitoring to request the classroom camera image. Wait for the image window, inspect the camera view, then close it.
  6. Finish one request and close its image window before starting the next. Close Device Control when you have finished.

What to expect: You can inspect the device display and the classroom camera image in separate requests.

Useful tip: screen_cut shows the device display; Real Time Class Monitoring shows the camera view. Use each image for its intended purpose and wait for the response before repeating a request.

05

DMS > Device Control > BasicControl > message.mac.Notify

Authorized device users · 2 min

Draft a device notification

Compose a titled message for a device.

  1. Open BasicControl for the intended device and select message.mac.Notify.
  2. Enter a short, clear Notification Title.
  3. Write the message in Notification Content. Use the editor formatting tools to make the text easy to read.
  4. Check the title, message, and target device. Use Cancel to leave the editor without sending the draft.

What to expect: A notification is ready for submission to the intended device.

Useful tip: Keep the title specific and the message brief. Check the selected device before preparing any classroom announcement.

Groups & automation

06

Group > Add / Config Device

Authorized device managers · 3 min

Prepare a group and its device list

Organize devices before using group controls.

  1. Open Group, then select Add.
  2. Enter a clear group name and choose the matching mac type: integrated machine or audio device. Review before submitting.
  3. In the group list, select Config Device for the intended group.
  4. Review Not Selected Device and Already Selected Device. Use the selection and transfer controls to prepare the intended membership.
  5. Review the two lists before selecting ConfirmingAssignments. Close the dialog if you do not intend to change membership.

What to expect: You know how to prepare a group and its device membership.

Useful tip: Review both device lists before saving membership. Use a descriptive group name, such as a building, floor, or classroom set.

07

DMS > select devices > Add Group

Authorized device managers · 2 min

Start a group from selected devices

Use the selection-dependent Add Group shortcut.

  1. Open DMS and tick the rows of the devices you intend to group.
  2. Select Add Group. The button becomes available after a device is selected.
  3. Enter the Group Name and review the listed MAC addresses and device count.
  4. Review the form before selecting Submit. Use Cancel if the selected devices are not the intended ones.

What to expect: A group form is prepared from the selected device rows.

Useful tip: This shortcut opens a group form using the selected device rows. Check the device count and MAC addresses before continuing.

08

DMS > Permission Setting

Authorized administrators · 2 min

Review who can access a device

Locate the device's user permission controls.

  1. Find the device in DMS and select Permission Setting.
  2. Review the users listed in mac permission setting and their selected state.
  3. Use your organization's access policy to decide which users should be selected.
  4. Select Submit only when an authorized access change is intended. Select Cancel to leave the existing permissions unchanged.

What to expect: You can locate the users associated with a device's permission form.

Useful tip: Device access is an administrator responsibility. Review the intended users and your organization access policy before changing a selection.

09

DMS > Device Control > work flow

Advanced device managers · 3 min

Review a workflow and its command sequence

Find a saved workflow and read its ordered command list.

  1. Open the work flow tab in Device Control. Use name and Search to find an entry.
  2. Use Edit to view its name and description. Close the form without saving when you only need to read it.
  3. Select set cmd to open the saved command sequence.
  4. Read the command names and parameters in order. Compare the sequence with the task you intend to perform.
  5. Close the command window after reviewing it. Keep the saved sequence unchanged while browsing.

What to expect: You can find a workflow and read its saved command sequence.

Useful tip: Read the whole sequence before making changes. The workflow list and the set cmd window show different levels of detail.

School accounts

10

Account > Teacher Management

Authorized school administrators · 3 min

Find and prepare a teacher account

Locate teacher accounts and their account/NFC configuration forms.

  1. Open Account > Teacher Management. Use teacher account and the courseware_management selector, then Search, to narrow the list.
  2. Select add teacher to open the account form.
  3. Review courseware_management, teacher account, teacher nickname, password, and status. The responsible user should enter credentials directly.
  4. Use Edit for an existing teacher's account details. Operate Config opens a separate NFC card number form.
  5. Submit only an approved account or NFC change. Use Cancel to inspect either form without saving.

What to expect: You can locate teacher account setup and the NFC card field.

Useful tip: Use the courseware_management choice assigned by your school administrator. Check the teacher account and nickname before preparing an NFC value.

11

Account > Class Management

Authorized school administrators · 3 min

Prepare grade and class details

Understand the grade-to-class setup sequence.

  1. Open Account > Class Management. Review the Grade List on the left.
  2. Use Add Grade to prepare Grade Name, Sort Order, and Description.
  3. Select the intended grade, then use Add Class.
  4. Enter Class Name and check Grade. Optionally choose a Class Device with Select Device, choose the Class Teacher, and add a Description.
  5. Review the details before Create Class. Use the class-name and teacher-name search fields to find an existing class.

What to expect: You can prepare a class within the intended grade.

Useful tip: Class Name and Grade are required. Device and teacher selections are optional. Check the grade before entering class details.

12

Account > Student Management

Authorized school administrators · 3 min

Prepare a student and parent record

Select the correct class before entering a student and parent details.

  1. Open Student Management and select the grade and class in the left-hand panel.
  2. Use Student No. or Student Name and Search to find a record. Select Add Student to prepare a new one.
  3. Enter Student No. and Student Name. Check the Grade and Class displayed in the form before continuing.
  4. Use Add Parent to enter Parent Name, Phone, optional Email, and Relationship. Review the parent entry before submitting it to the form.
  5. Review the complete student record and parent details together. Use Cancel to leave without saving a new record.

What to expect: A student record can be prepared for the intended class, with the correct parent contact details.

Useful tip: Check the grade, class, student number, and parent relationship together to avoid placing a record in the wrong class.

13

Pick-up System > Position

Authorized school administrators · 2 min

Prepare a pick-up position

Locate the position list and its setup form.

  1. Open Pick-up System > Position.
  2. Use Position Name or Address and Search to find a position.
  3. Select Add Position. Check courseware_management, enter the required Position, and add Address and Thumbnail if needed.
  4. Review before Submit, or select Cancel to leave without creating a position.

What to expect: You can prepare a pick-up position record.

Useful tip: Use a recognizable position name and a complete address. Choose a thumbnail that helps staff identify the location.

AI tools

14

AI Gen > Lesson

Teaching-content users · 3 min

Generate a lesson

Create and review a lesson from a short teaching prompt.

  1. Open AI Gen > Lesson and review the available template.
  2. Set Grade, Language, Subject, Standards, Page Count, Outcome, Time, and Structure. Add Teacher if needed.
  3. Choose whether to include video or image content, then enter a specific theme in the prompt area.
  4. Select GENERATION and wait for the preview. Review all generated pages or sections and check the educational content.
  5. Select Save HTML to store the result, then open the lower Resource entry > AiCloud(owner) > lesson to confirm the saved file.

What to expect: A generated lesson appears in the preview and can be saved in AiCloud.

Useful tip: Example topic: Adding numbers from 1 to 10 using simple beginner examples. Read every preview section and check its content before saving.

15

AI Gen > Quizzes

Teaching-content users · 3 min

Generate and review a quiz

Prepare quiz questions and review their answers before classroom use.

  1. Open Quizzes and review the template.
  2. Choose Language, Subject, Grade, Level, Quantity, and Question Type.
  3. Enter the topic and select GENERATION.
  4. Review the generated question and options. Use Check Answer to display the correct answer and explanation; Reset Answer lets you try again.
  5. Review every generated question and its explanation before using the quiz in a lesson.

What to expect: A quiz preview is available for checking before use.

Useful tip: Check each question, answer, and explanation before classroom use. Regenerate a question that needs correction and review it again.

16

AI Gen > FLASH

Teaching-content users · 2 min

Generate flashcards

Create a short set of teaching cards.

  1. Open FLASH and review the flashcard template.
  2. Choose Grade, Language, and Count.
  3. Enter the theme, then select GENERATION.
  4. Review the generated card text, numbers, and examples in the preview.
  5. Select Save HTML and confirm the saved file in the lower Resource entry > AiCloud(owner) > flashcard.

What to expect: A flashcard appears in the preview and can be stored in AiCloud.

Useful tip: Use one teaching idea per card and check the wording, numbers, and examples before saving.

17

AI Gen > Setting

Authorized content administrators · 2 min

Review AI configuration choices

Find the lists of values used by the AI generation forms.

  1. Open AI Gen > Setting.
  2. Choose ai Lesson Setting, ai Quiz Setting, ai Flashcard Setting, or ai Guide Setting.
  3. Review each Key and its Value list. These include choices such as languages, grades, subjects, counts, and question types.
  4. Use Edit only when you are authorized to change the available options. Use Refresh to reload the displayed list.

What to expect: You can locate the configured option lists behind the generation forms.

Useful tip: These tabs organize the choices used in generation forms. Check the relevant content type before opening an option list.

Resources

18

Lower Resource entry

Resource users · 3 min

Browse PHET, 3D, and cloud resource folders

Choose the right resource module.

  1. Select the lower Resource sidebar entry, which opens the module cards.
  2. Choose Enter on PHET Resource to browse the simulation catalog. Use pagination to browse the available rows.
  3. Choose Enter on 3D to browse subject folders such as Astronomy, Biology, Chemical, Geograph, and Physics.
  4. Double-click a folder to open it. For planet model files, browse Astronomy > Planet > Terrestrial planet.
  5. Choose AiCloud(owner) for your account's resources or an available shared cloud card for shared material. Use Back to Top to return to the module cards.

What to expect: You can navigate from the module catalog to the resource collection you need.

Useful tip: Use the module cards to choose a collection, then use pagination or folders to browse it. The breadcrumb identifies your current folder.

19

Lower Resource entry > AiCloud(owner)

Resource owners · 3 min

Organize files in AiCloud

Find saved AI content and understand the file actions.

  1. Open AiCloud(owner). Double-click lesson or flashcard to open the folder. Use the breadcrumb or parent-directory row to go back.
  2. Find the saved lesson or flashcard by its name in the file list.
  3. Select Rename for a file you own. Enter the New File Name, preserve its extension, then select Confirm.
  4. Check the updated name in the list. Use clear names that identify the subject and teaching topic.
  5. Open Setting to review Thumbnail and Is Public. Close the form without changing access when you only need to inspect it.

What to expect: You can locate saved content and organize owned files.

Useful tip: Save HTML for lessons and flashcards stores the file in AiCloud. Open the matching folder to find it; this action is separate from a browser download.

20

Expandable Resource > Subject Management

Authorized resource managers · 2 min

Find subject categories

Distinguish subject-category management from the resource module catalog.

  1. Expand the upper Resource menu and select Subject Management.
  2. Use name and Search to find a category, or Refresh to reload the list.
  3. Use add cate to prepare a category name and sort value.
  4. Check the displayed Path before submitting a category. Select Cancel if you are only exploring the form.

What to expect: You can find the subject-category list and its add form.

Useful tip: Subject Management organizes category names and sort values. Use the separate Resource module cards to browse the resource library.

My account

21

MyCenter > Setting

Account users; email setup by administrators · 3 min

Find personal and email settings

Locate your profile and mail-server configuration fields.

  1. Open MyCenter > Setting, or select Personal Settings from the account menu.
  2. In BasicSettings, review UserName, RealName, and the optional Country selection.
  3. Open Security Email to locate Email, Email Password, Email Port, Email Host, and Email From.
  4. Obtain the mail-server values from your administrator. Close the form without saving when you only need to inspect the fields.

What to expect: You can find the appropriate account or mail-configuration area.

Useful tip: Security Email contains mail-server and sender settings. Use your organization mail-server details for these fields.

Help & common questions

Why is a device marked Enable but unavailable?

Check Online Status separately. Enable describes the registration state. Check device power and network connectivity, then search again.

Why is Add Group disabled?

Select at least one device row in DMS. Then open Add Group and review the selected device list.

How do I search for a specific device?

Enter the complete Device Mac in Please enter deviceId, clear an unused Remark filter, and select Search. You can also search by Remark.

Where does Save HTML store a lesson or flashcard?

Open the separate Resource entry, choose AiCloud(owner), then open lesson or flashcard. Save HTML stores the file in the cloud.

What is the difference between screen_cut and class monitoring?

screen_cut displays a screenshot of the device display. Real Time Class Monitoring displays the classroom camera image. Close one image request before starting the next.

Why is a list empty?

Check the selected grade, class, folder, and search filters. Use Search or Refresh where available and wait for loading to finish.

How should I review AI teaching content?

Read all generated sections and check facts, wording, answers, and explanations before use. Regenerate content that needs correction.

How do I browse a form without changing data?

Open the form, read its fields, then select Cancel or its close button. Use Submit only when you intend to save or send an action.